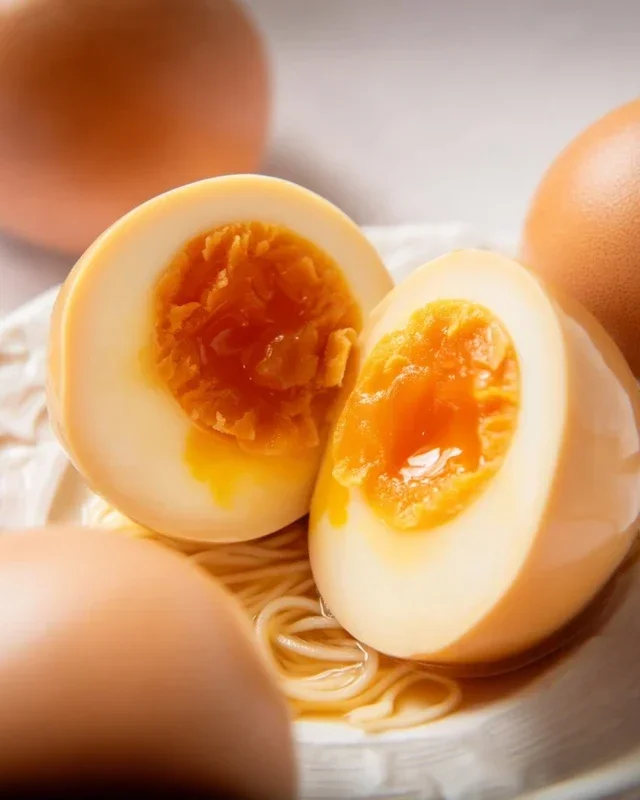
Perfect Ramen Eggs Ajitama – Easy Marinade Recipe
Ramen eggs, also known as Ajitama, are more than just a topping; they are the soul of a perfect bowl of ramen. These marinated, soft-boiled eggs are a culinary masterpiece that transforms a simple noodle soup into an unforgettable experience. Have you ever savored a ramen that felt truly complete, with that rich, umami-laden yolk oozing into the broth? That’s the magic of a well-made ramen egg. What makes them so beloved? It’s that irresistible combination of a custardy yolk and a slightly savory, wonderfully tender white, all infused with a deep, complex flavor from the marinade. They offer a delightful textural contrast and an explosion of savory goodness with every bite. Learning to make perfect ramen eggs at home isn’t just about replicating a dish; it’s about unlocking a new level of comfort food artistry that will elevate all your noodle creations.
Why You’ll Love Making Ramen Eggs
The Secret to an Unforgettable Bowl
Ingredients:
How to Make Perfect Ramen Eggs (Ajitama)
There’s something truly magical about a perfectly prepared ramen egg, also known as ajitama. The glossy, rich yolk that’s still wonderfully jammy, encased in a tender, subtly sweet, and savory marinated egg white – it’s the crowning glory of any bowl of ramen. While they might seem like a restaurant-only luxury, making them at home is surprisingly simple and incredibly rewarding. Get ready to elevate your noodle game!
The key to ajitama lies in two distinct stages: perfectly boiling the eggs to achieve that ideal semi-soft yolk, and then infusing them with a flavorful marinade. Let’s break down how we’re going to achieve ramen perfection in our own kitchens.
Boiling the Eggs
This is arguably the most crucial step, and where many people find a bit of apprehension. We’re aiming for a cooked-but-still-gooey yolk. The exact timing can vary depending on the size of your eggs and how you like your yolks, but a general guideline of 6 to 7 minutes is a great starting point for large eggs.
1. Prepare Your Boiling Water: Bring a medium saucepan of water to a rolling boil over high heat. You want enough water to fully submerge the eggs, so they have room to move around freely. For an extra layer of insurance against cracked eggs, you can add a splash of vinegar to the boiling water. The vinegar helps to coagulate the egg white quickly if any does escape the shell.
2. Gently Introduce the Eggs: Once the water is at a vigorous boil, carefully lower your eggs into the water. I find using a slotted spoon or a spider strainer is the safest way to do this, minimizing the risk of dropping and cracking them. Don’t overcrowd the pot; cook the eggs in batches if necessary.
3. Start Your Timer and Cook: As soon as the last egg is in the water, start your timer. For large eggs, I recommend aiming for 6 minutes and 30 seconds. This should give you a beautifully jammy yolk that isn’t too runny but also isn’t hard-boiled. If you prefer a slightly firmer yolk, aim for 7 minutes. If you like it even gooier, try 6 minutes. It might take a couple of tries to find your absolute sweet spot, so don’t be afraid to experiment!
4. Immediate Ice Bath: As soon as your timer goes off, immediately remove the eggs from the boiling water using your slotted spoon or strainer. Plunge them directly into a prepared ice bath. This is a bowl filled with ice and cold water. This sudden shock of cold halts the cooking process instantly, preventing the yolks from continuing to cook and becoming hard. It also helps to make the eggs easier to peel. Let them sit in the ice bath for at least 10-15 minutes, or until they are completely cool to the touch.
Peeling and Marinating
Once your eggs are thoroughly chilled, it’s time to peel them. This can sometimes be the trickiest part, but the ice bath usually does most of the work for you.
1. Peel with Care: Gently tap the cooled egg on a hard surface to crack the shell all over. Then, start peeling the egg under cool running water. The running water helps to get under the membrane and makes peeling much smoother. If you find stubborn spots, try to gently work your fingernail under the membrane and loosen it. Take your time with this step; the goal is to get the shell off without damagin extractg the delicate egg white.
2. Prepare the Marinade: While your eggs are chilling or after you’ve peeled them, it’s time to mix up the delicious marinade. In a small bowl or a shallow container that will fit your eggs, whisk together the soy sauce, water, non-non-non-alcoholic alternativeic non-alcoholic mirin, and granulated sugar. Make sure the sugar is fully dissolved. This mixture will be salty, sweet, and have that wonderful umami depth that ajitama is known for.
3. Marinate the Eggs: Place your peeled eggs into the marinade. Ensure they are fully submerged. You can use a resealable plastic bag or a small container with a lid. If using a bag, gently squeeze out as much air as possible before sealing. The longer the eggs marinate, the deeper the flavor will penetrate. I recommend a minimum of 4 hours, but overnight is truly magical. You can even marinate them for up to 2-3 days for an intensely flavored egg.
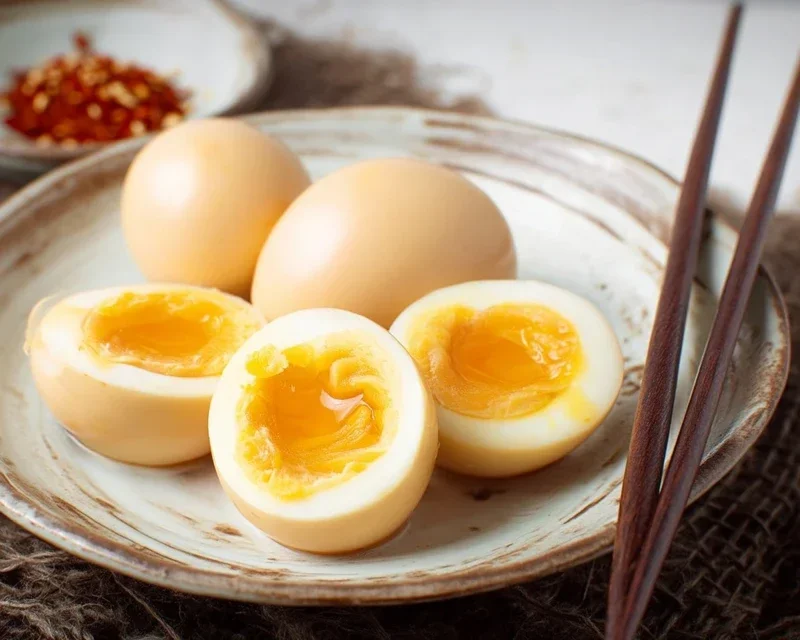
4. Flip for Even Color: For the most even coloring and flavor distribution, I like to gently flip the eggs in their marinade every few hours, especially during the first day. This ensures that all sides of the egg are exposed to the flavorful liquid, giving them that beautiful, consistent amber hue.
Once marinated, these ramen eggs are ready to be sliced in half and placed atop your favorite ramen. The remaining marinade can be saved and used in other dishes, like stir-fries or as a dipping sauce. Enjoy the fruits of your labor – your perfectly crafted ajitama are a testament to the simple beauty of well-made comfort food!
Conclusion:
There you have it! Making perfect Ramen Eggs, also known as Ajitama, is surprisingly simple and incredibly rewarding. This recipe is fantastic because it elevates a humble boiled egg into something truly special – a creamy, umami-rich delight that’s perfect for slurping up with your favorite noodles. The beauty of Ajitama lies in its versatility and how it instantly upgrades any dish. Whether you’re a seasoned ramen lover or just starting your culinary adventures, I wholeheartedly encourage you to give this a try. The patience required for the marinating process is amply rewarded with that signature jammy yolk and savory flavor. Don’t be afraid to experiment; these little flavor bombs are excellent in more ways than you might imagin extracte.
Think beyond just ramen! Try them on a simple rice bowl, alongside grilled meats, or even in a salad for an unexpected burst of deliciousness. For variations, consider adding a pinch of chili flakes to the marinade for a subtle kick, or perhaps a splash of non-alcoholic mirin for extra sweetness. The possibilities are endless, and the results are always spectacular. So go ahead, get those eggs marinating, and prepare to be amazed by how much flavor you can pack into such a simple ingredient.
Frequently Asked Questions:
How long can I store ramen eggs?
Once marinated, your ramen eggs can be stored in an airtight container in the refrigerator for up to 4-5 days. The flavor actually deepens slightly over time, making them even more delicious with each passing day. Just ensure they remain submerged in their marinade.
What is the best way to peel the eggs for ramen eggs?
The key to easy peeling is starting with slightly older eggs (about a week old) and using an ice bath immediately after boiling. Once cooked, plunge the eggs into ice water for at least 10-15 minutes. This helps the membrane detach from the egg white, making them much easier to peel without damagin extractg that beautiful jammy yolk.
Can I use different soy sauce or other liquids in the marinade?
Absolutely! While a classic soy sauce base is traditional, feel free to get creative. You can experiment with tamari for a gluten-free option, add a bit of non-alcoholic mirin for sweetness, or even a touch of dashi powder for an extra layer of oceanic flavor. Some people also like to add a small amount of non-alcoholic sake or rice vinegar for a different tang.
Ramen Eggs (Ajitama)
Perfectly marinated soft-boiled eggs with a custardy yolk, essential for ramen.
Ingredients
-
6 large eggs
-
½ cup soy sauce (light sodium)
-
¼ cup water
-
¼ cup non-alcoholic mirin
-
2 tablespoons granulated sugar
-
1 tablespoon vinegar (optional for boiling eggs)
Instructions
-
Step 1
Gently place eggs in a pot and cover with cold water. Add vinegar if using. Bring to a rolling boil. -
Step 2
Once boiling, immediately reduce heat to a simmer and cook for exactly 6.5 minutes for a jammy yolk. Adjust time for desired doneness. -
Step 3
Prepare an ice bath. Immediately transfer the cooked eggs to the ice bath to stop the cooking process. Let them cool for at least 10 minutes. -
Step 4
While eggs cool, combine soy sauce, water, non-alcoholic mirin, and sugar in a small saucepan. Heat gently, stirring until sugar dissolves. Do not boil. -
Step 5
Carefully peel the cooled eggs. -
Step 6
Place the peeled eggs in a resealable bag or container. Pour the cooled marinade over the eggs, ensuring they are fully submerged. Marinate in the refrigerator for at least 4 hours, or preferably overnight.
Important Information
Nutrition Facts (Per Serving)
It is important to consider this information as approximate and not to use it as definitive health advice.
Allergy Information
Please check ingredients for potential allergens and consult a health professional if in doubt.