Red White Blue Cheesecake Strawberries Recipe
Red, White, and Blue Cheesecake Strawberries are the ultimate sweet treat that embodies summer celebration! Imagin extracte the vibrant, juicy sweetness of fresh strawberries cradling a creamy, luscious cheesecake filling, all dusted with patriotic flair. It’s no wonder these delightful bites are a crowd-pleaser at barbecues, picnics, and any gathering where a touch of festive indulgence is welcome. They offer that perfect balance of fruitiness and rich dessert decadence that we all crave. What truly sets these Red, White, and Blue Cheesecake Strawberries apart is their effortless elegance and the burst of flavor in every bite. They’re surprisingly simple to make, allowing you to channel your inner baker and create something truly memorable without spending hours in the kitchen. Get ready to wow your guests with these beautiful and delicious patriotic delights!
Red, White, and Blue Cheesecake Strawberries
Get ready to impress your friends and family with these incredibly easy yet utterly delightful Red, White, and Blue Cheesecake Strawberries! These festive treats are perfect for any summer gathering, holiday celebration, or just because you want a burst of patriotic flavor. They combine the creamy indulgence of cheesecake with the fresh sweetness of berries, all without the fuss of baking a traditional cheesecake. The visual appeal is undeniable, making them a showstopper that tastes as good as it looks. I love making these for barbecues and picnics because they’re portable and always a huge hit. The simple combination of flavors and textures creates a truly satisfying dessert experience.
Ingredients:
Instructions:
Preparing the Cheesecake Filling
The first step to creating these delightful strawberries is to whip up a luscious, no-bake cheesecake filling. This filling is remarkably simple, relying on just a few key ingredients to achieve that signature creamy texture and subtle sweetness. To begin extract, ensure your 8-ounce package of cream cheese is properly softened. This is crucial for achieving a smooth, lump-free filling. You can leave it on the counter for about an hour, or if you’re in a hurry, you can gently warm it in the microwave for short bursts, being careful not to melt it completely. Place the softened cream cheese into a medium-sized mixing bowl. Add the 1/2 cup of confectioners’ sugar to the bowl with the cream cheese. Confectioners’ sugar, also known as powdered sugar, is essential here because it dissolves easily and provides a smooth, velvety texture to the filling, unlike granulated sugar which can leave a gritty feel. Using an electric mixer (a hand mixer or stand mixer with a paddle attachment works best), beat the cream cheese and confectioners’ sugar together until the mixture is light, fluffy, and well combined. Scrape down the sides of the bowl occasionally to ensure all the ingredients are incorporated.
Next, we’ll fold in the whipped topping and almond extract. Gently add the 1 cup of thawed whipped topping to the cream cheese mixture. Thawed whipped topping is important because frozen whipped topping can introduce excess moisture and create an undesirable watery consistency. Now, add the 1/2 teaspoon of almond extract. Almond extract provides a wonderful, subtle nutty flavor that pairs beautifully with strawberries and cream cheese, adding a touch of sophistication to this simple dessert. Using a spatula or a rubber scraper, carefully fold the whipped topping and almond extract into the cream cheese mixture. Continue folding until everything is just combined and no streaks of cream cheese or whipped topping remain. Be gentle during this process; overmixing can deflate the whipped topping and make the filling less airy. The goal is a light, airy, and creamy consistency that will hold its shape.
Assembling the Red, White, and Blue Masterpieces
Now for the fun part: assembling our patriotic strawberries! Start by preparing your strawberries. Wash and thoroughly dry the 12 large strawberries. Once they are dry, carefully cut each strawberry in half lengthwise. You want to ensure they are stable enough to hold the filling. These halved strawberries will serve as our “boats” for the delicious cheesecake mixture. You can discard the green tops if you prefer a cleaner look, or leave them on for a more rustic presentation.
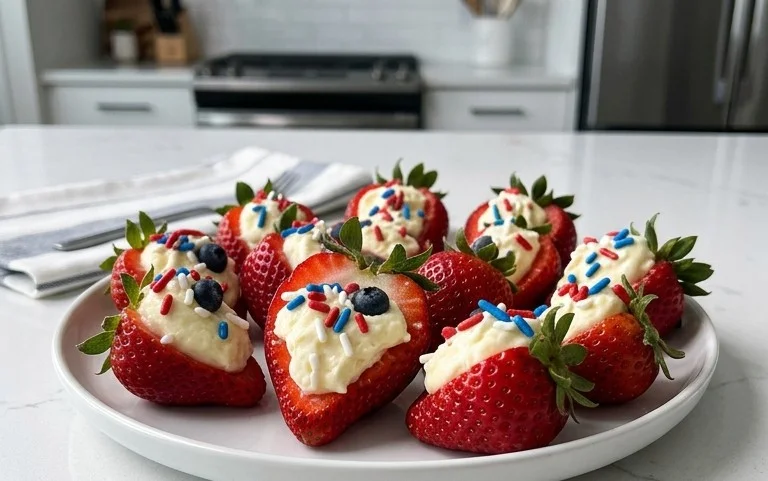
Using a small spoon or a piping bag fitted with a round tip, generously spoon or pipe the cheesecake filling onto the cut side of each strawberry half. Don’t be shy with the filling; you want a good amount to create that delightful cheesecake flavor. Aim for a nice dollop that creates a beautiful mound. Ensure the filling is spread evenly across the surface.
Finally, it’s time to add the “blue” to our red, white, and blue theme. Carefully place three plump blueberries onto the top of the cheesecake filling on each strawberry half. Arrange them artfully to create a festive visual. The vibrant blue of the blueberries against the white filling and red strawberry is truly striking. You can place them in a small cluster or a line; experiment to see what you like best!
Chilling and Serving
Once your Red, White, and Blue Cheesecake Strawberries are assembled, it’s time to let them chill. This chilling step is essential for the cheesecake filling to firm up slightly, making them easier to handle and ensuring the flavors meld together perfectly. Carefully arrange the finished strawberries on a serving platter or in individual serving dishes. Cover the platter loosely with plastic wrap, making sure not to smudge the filling. Refrigerate for at least 30 minutes before serving. This allows the filling to set up nicely. For an even firmer filling and deeper flavor, you can chill them for an hour or two. These are best served chilled, as the cool, creamy filling is incredibly refreshing. They are a perfect make-ahead dessert, which is always a bonus when entertaining. You can assemble them a few hours in advance, but it’s generally best to add the blueberries just before serving to maintain their vibrant color and prevent them from bleeding into the filling. Enjoy these simple yet spectacular treats that are sure to be a hit!
Conclusion:
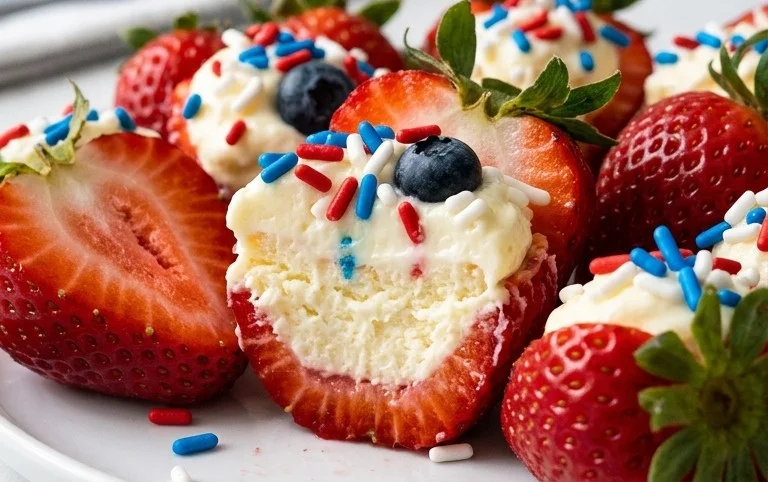
There you have it! My Red, White, and Blue Cheesecake Strawberries recipe is truly a showstopper, perfect for any patriotic celebration or simply when you crave a delightful and visually stunning treat. The creamy cheesecake filling nestled inside plump, juicy strawberries, topped with a vibrant berry medley, creates a symphony of flavors and textures that’s simply irresistible. These little gems are incredibly easy to make, requiring no baking, which means less fuss and more time to enjoy your guests. They’re light enough to be a refreshing dessert after a hearty meal, yet decadent enough to feel like a real indulgence.
I love serving these cheesecake strawberries as a festive dessert for the Fourth of July, Memorial Day, or any summer gathering. They also make a fantastic addition to a brunch spread or a charming treat for a birthday party. Feel free to get creative with your toppings! Consider a drizzle of white chocolate or a sprinkle of toasted coconut for added flair. You could even experiment with different berry combinations if strawberries aren’t in season.
I wholeheartedly encourage you to give this recipe a try! It’s a fun and rewarding way to bring a touch of homemade magic to your table. I’m confident you’ll be delighted by how simple yet impressive these Red, White, and Blue Cheesecake Strawberries turn out.
Frequently Asked Questions:
Can I make these cheesecake strawberries ahead of time?
Yes, you absolutely can! I recommend preparing them a few hours in advance, up to a day. Store them covered in the refrigerator. The longer they sit, the more the flavors meld, but be mindful that the strawberries may release a little liquid over extended periods.
What kind of cream cheese should I use?
Full-fat block cream cheese is best for achieving that wonderfully rich and creamy cheesecake texture. Avoid using whipped cream cheese or spreadable cream cheese from a tub, as they can alter the consistency of the filling.
My strawberries are a bit large. Will that affect the recipe?
Not at all! Larger strawberries will simply hold more of that delicious cheesecake filling, making for an even more decadent bite. Just ensure you hollow them out sufficiently to create a good cavity for the filling.
Red, White, and Blue Cheesecake Strawberries
A festive and easy no-bake dessert featuring cream cheese filling topped with strawberries and blueberries.
Ingredients
-
1 (8 ounce) package cream cheese, softened
-
1/2 cup confectioners’ sugar
-
1 cup whipped topping, thawed
-
1/2 teaspoon almond extract
-
12 large strawberries, cut in half
-
36 blueberries
Instructions
-
Step 1
In a medium bowl, beat the softened cream cheese and confectioners’ sugar until smooth. -
Step 2
Gently fold in the thawed whipped topping and almond extract until combined. -
Step 3
Arrange the halved strawberries on a serving platter. -
Step 4
Spoon or pipe the cream cheese mixture onto the cut side of each strawberry half. -
Step 5
Top each cheesecake-filled strawberry with a few blueberries. -
Step 6
Chill for at least 15 minutes before serving.
Important Information
Nutrition Facts (Per Serving)
It is important to consider this information as approximate and not to use it as definitive health advice.
Allergy Information
Please check ingredients for potential allergens and consult a health professional if in doubt.