Brown Butter Brookies – Decadent Chocolate Chip Brownie Cookie Bars
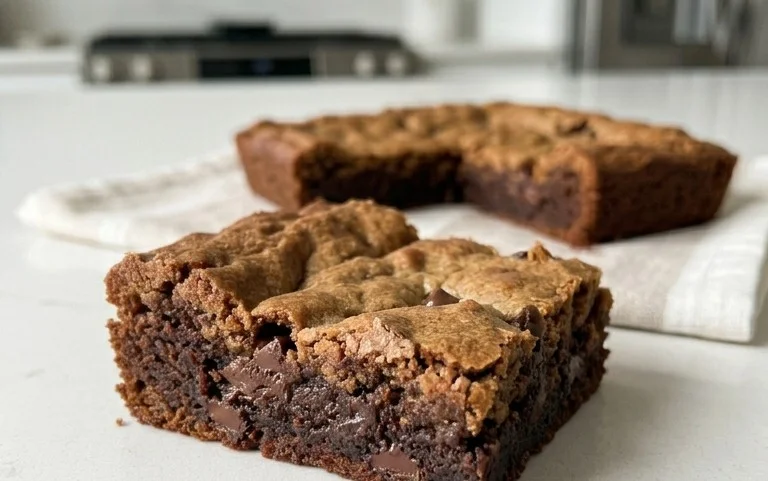
Brown Butter Brookies are the ultimate dessert mashup, a glorious marriage of two beloved classics: rich, chewy brownies and buttery, crisp chocolate chip cookies. If you’ve ever found yourself torn between these two titans of the sweet treat world, then these Brown Butter Brookies are about to become your new obsession. What makes them so irresistible? It’s the magical alchemy that happens when you swirl together a fudgy brownie base with pockets of molten chocolate and then top it with that irresistible cookie dough, all elevated by the nutty, complex aroma and flavor of browned butter. We’re talking about a dessert that delivers on every front – a tender, moist brownie bottom giving way to a slightly crisp, golden cookie top. It’s a textural symphony and a flavor explosion that will have everyone beggin extractg for the recipe. Get ready to experience pure dessert bliss!
Brown Butter Brookies
Get ready to embark on a culinary adventure that marries the rich, fudgy depth of brownies with the chewy, buttery perfection of chocolate chip cookies. These Brown Butter Brookies are not just a dessert; they’re an experience. The secret weapon? Brown butter. Browning butter unlocks a nutty, toasted aroma and a deeper, more complex flavor that elevates both the brownie and cookie layers to extraordinary heights. Prepare yourself for a dessert that will have everyone beggin extractg for the recipe.
Ingredients:
Crafting the Brownie Layer: The Rich Foundation
The journey to brookies begin extracts with the brownie base. This isn’t just any brownie; it’s a deeply chocolatey, intensely satisfying foundation that’s going to be the perfect counterpoint to the cookie dough.
Building the Cookie Layer: Chewy Perfection
Now for the cookie dough, which will crown our brownie base. This is where we’ll get that classic chewy cookie texture and flavor.
Assembling and Baking Your Masterpiece
The magic happens when these two delicious components come together.
These Brown Butter Brookies are best enjoyed at room temperature, perhaps with a glass of cold milk or a steaming cup of coffee. The combination of the rich, fudgy brownie and the chewy, golden cookie, both infused with the incredible flavor of browned butter, is truly a match made in dessert heaven. Enjoy every single delicious bite!
Conclusion:
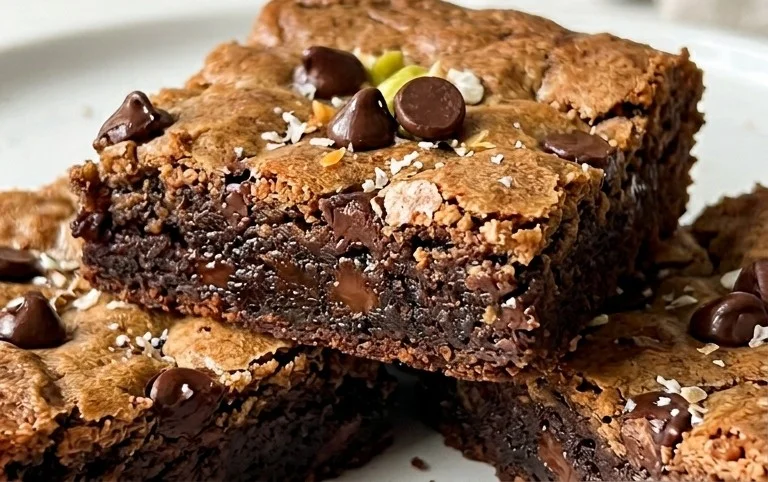
So there you have it – the ultimate guide to crafting irresistible Brown Butter Brookies! This recipe truly hits all the right notes: the rich, nutty depth of brown butter elevates both the fudgy brownie layer and the chewy chocolate chip cookie topping to an entirely new level. The textural contrast is divine – a crisp cookie edge giving way to a soft, gooey brownie center, studded with melty chocolate. It’s the best of both worlds in every single bite, making it a guaranteed crowd-pleaser for any occasion. Don’t be intimidated by the brown butter step; it’s simple and incredibly rewarding. I encourage you to give these Brown Butter Brookies a try – you won’t regret it!
For serving, these are fantastic on their own, but imagin extracte them warm with a scoop of vanilla bean ice cream melting into the gooey center. They also make a wonderful addition to a dessert platter or a thoughtful homemade gift. If you’re feeling adventurous, consider adding a sprinkle of flaky sea salt on top before baking for a touch of salty-sweet perfection, or swirl in some caramel sauce between the layers for an extra decadent treat.
Frequently Asked Questions:
Can I make the brownie and cookie layers separately?
Absolutely! You can bake the brownie layer first, let it cool slightly, then spread the cookie dough over the top before baking the brookies. This can sometimes make for a cleaner separation if that’s your preference, though the magic of brookies is often the slight swirl and integration of the two batters.
How should I store my Brown Butter Brookies?
Once completely cooled, store your brookies in an airtight container at room temperature for up to 3-4 days. They are often even more delicious the next day as the flavors meld together.
Brown Butter Brookies
A decadent fusion of chewy chocolate chip cookies and fudgy brownies, elevated with the rich, nutty flavor of brown butter.
Ingredients
-
180 g butter
-
320 g chocolate (for melting)
-
120 g all purpose flour
-
50 g cocoa powder
-
180 g Granulated Sugar
-
80 g brown sugar
-
2 g salt
-
4 eggs
-
120 g chocolate chunks
-
85 g all-purpose flour
-
80 g butter
-
80 g brown sugar
-
40 g granulated sugar
-
1 g salt
-
1 egg
Instructions
-
Step 1
Brown the 180g butter in a saucepan over medium heat until it turns a rich nutty brown. Let cool slightly. In a large bowl, whisk together the cooled brown butter, 320g melted chocolate, 180g granulated sugar, and 80g brown sugar. Beat in 4 eggs one at a time until well combined. -
Step 2
In a separate bowl, whisk together 120g all-purpose flour, 50g cocoa powder, and 2g salt. Gradually add the dry ingredients to the wet ingredients, mixing until just combined. Fold in 120g chocolate chunks if using. -
Step 3
Prepare the cookie dough: In a medium bowl, cream together 80g softened butter, 80g brown sugar, and 40g granulated sugar until light and fluffy. Beat in 1 egg and 1g salt. -
Step 4
Add 85g all-purpose flour to the cookie dough mixture and mix until just combined. Do not overmix. -
Step 5
Preheat your oven to 175°C (350°F). Line a 9×13 inch baking pan with parchment paper, leaving an overhang on the sides. Pour the brownie batter into the prepared pan and spread evenly. -
Step 6
Dollop spoonfuls of the cookie dough over the brownie batter. Gently swirl the cookie dough into the brownie batter using a knife or toothpick to create a marbled effect. -
Step 7
Bake for 30-35 minutes, or until the edges are set and a toothpick inserted into the center comes out with moist crumbs. Let cool completely in the pan before slicing.
Important Information
Nutrition Facts (Per Serving)
It is important to consider this information as approximate and not to use it as definitive health advice.
Allergy Information
Please check ingredients for potential allergens and consult a health professional if in doubt.