Easy Strawberry Cheesecake Dump Cake Recipe
Strawberry Cheesecake Dump Cake is the answer to your dessert prayers when you crave something decadent but have zero time for fuss. I’m talking about pure, unadulterated bliss in every single bite. Imagin extracte the creamy tang of cheesecake meeting the sweet burst of strawberries, all nestled under a buttery, golden cake topping that requires absolutely no mixing. Yes, you read that right – no bowls, no electric mixers, just pure, simple magic. This isn’t your average cake; it’s a revelation in ease and flavor. People adore this strawberry cheesecake dump cake because it delivers all the indulgence of a classic dessert with a fraction of the effort. What truly makes this strawberry cheesecake dump cake special is its “dump and bake” nature. It’s the ultimate shortcut to impressing your friends and family, or simply treating yourself to something extraordinary without breaking a sweat. Get ready to fall head over heels for this ridiculously easy yet incredibly delicious creation.
Strawberry Cheesecake Dump Cake
Welcome to a recipe that redefines “easy dessert”! If you’re craving the rich, creamy goodness of cheesecake paired with the sweet burst of strawberries, but you’re short on time or kitchen confidence, then this Strawberry Cheesecake Dump Cake is your new best friend. Forget complicated steps, water baths, and endless mixing. This dessert lives up to its name – you simply dump the ingredients into a baking dish and let the oven do the rest. The result is a decadent, layered treat with a gooey strawberry bottom, a luscious cream cheese middle, and a perfectly baked cake topping. It’s the ultimate no-fuss dessert that will impress your guests (or just make your own evening a little sweeter).
Ingredients:
Cooking Instructions
Step 1: Prepare the Cream Cheese Layer
The foundation of our luscious cheesecake layer is pretty straightforward. In a medium bowl, combine your softened cream cheese, granulated sugar, and vanilla extract. Make sure your cream cheese is truly softened – it should be easily pliable and yield to the touch. This will ensure you can mix it smoothly without any lumps. You can use a hand mixer for this or a sturdy whisk. Beat these ingredients together until the mixture is smooth and creamy, with no grainy texture from the sugar. This step is crucial for achieving that characteristic cheesecake tang and velvety texture without the usual fuss. If you’re feeling adventurous, you could add a pinch of lemon zest here for an extra bright flavor, but the vanilla is perfectly classic.
Step 2: Assemble the Strawberry and Cream Cheese Layers
Now for the “dump” part! Take your 9×13 inch baking dish. I recommend greasing it lightly with butter or non-stick spray, even though the butter from the cake mix will help, it’s an extra insurance policy against sticking. Pour the entire can of strawberry pie filling into the bottom of the prepared baking dish. Spread it out evenly to create a uniform layer. Next, dollop spoonfuls of your cream cheese mixture over the strawberry layer. Don’t worry about making it perfect; you can gently spread it out with the back of a spoon or a spatula, but some unevenness is perfectly fine and will create lovely pockets of cream cheese. The goal here is to distribute the creaminess across the sweet strawberries.
Step 3: Create the Cake Topping
This is where the magic truly happens with minimal effort. In a separate bowl, empty the entire box of yellow or white cake mix. Do not prepare the cake mix according to the package directions; we’re using it as is. Pour the melted butter over the dry cake mix. Then, add the milk. Stir these ingredients together just until combined. The mixture will be thick and somewhat lumpy; this is exactly what you want. It won’t be a smooth batter. Now, carefully spoon this thick cake mixture over the cream cheese and strawberry layers in your baking dish. Try to cover as much of the surface as possible. Don’t worry if there are some gaps; the cake will expand as it bakes and fill them in. If you’re using the optional cinnamon, sprinkle it evenly over the cake mixture now. This adds a wonderful warmth and aroma.
Step 4: Add Optional Nuts and Bake
If you’ve opted for the nutty crunch, now is the time to sprinkle your chopped pecans or walnuts evenly over the cake mixture. This adds a delightful textural contrast to the soft cake and creamy filling. Preheat your oven to 350 degrees Fahrenheit (175 degrees Celsius). Place the assembled dump cake into the preheated oven. Bake for approximately 45 to 55 minutes. The cake should be golden brown and a toothpick inserted into the cakey top should come out mostly clean (a few moist crum extractbs are okay, but no wet batter). The strawberry filling will be bubbly around the edges. The aroma filling your kitchen will be absolutely divine, a sweet symphony of strawberry and baked cake.
Step 5: Cool and Serve
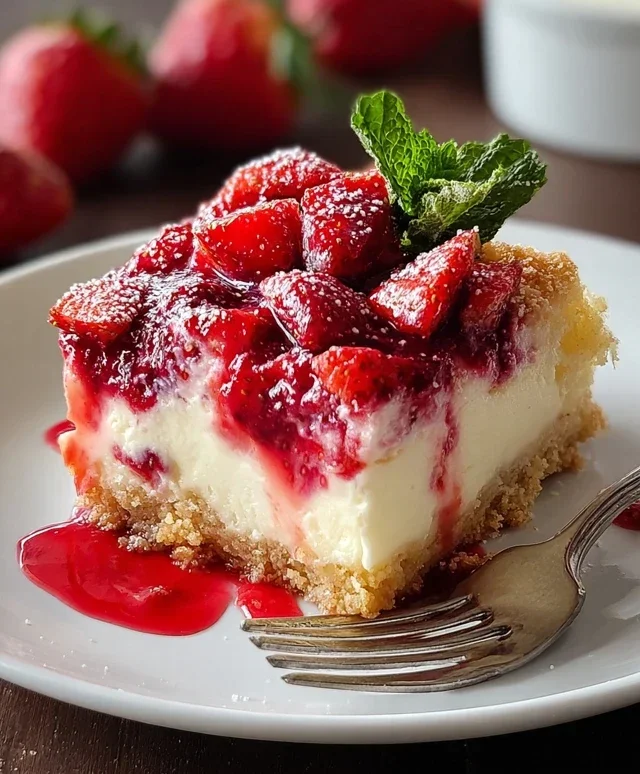
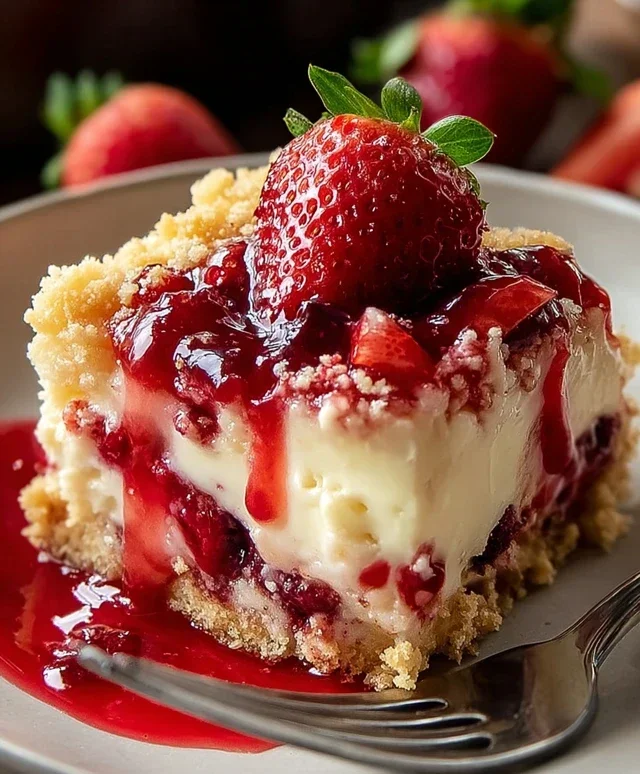
Once your Strawberry Cheesecake Dump Cake is baked to perfection, remove it from the oven. It’s tempting to dive in immediately, but I highly recommend letting it cool for at least 20 to 30 minutes. This allows the layers to set properly, making it easier to scoop and preventing the cream cheese layer from being too runny. The heat will also continue to cook the residual batter. Serve warm portions of this incredible dessert. The absolute best way to enjoy it is with a generous dollop of whipped cream and a scoop of creamy vanilla ice cream. The contrast of the warm dump cake with the cold ice cream is pure bliss. Garnish with a few fresh strawberries for an extra pop of color and freshness. This dessert is incredibly forgiving and always a crowd-pleaser, perfect for potlucks, holidays, or just a spontaneous treat. Enjoy every delicious bite!
Conclusion:
And there you have it – your incredibly simple, yet utterly decadent Strawberry Cheesecake Dump Cake! This recipe truly shines because it delivers all the beloved flavors of strawberry cheesecake with minimal effort. No complicated steps, no fancy equipment, just pure, unadulterated deliciousness. It’s the perfect dessert for busy weeknights, impromptu gatherings, or whenever you’re craving something sweet and satisfying without the fuss. The creamy, tangy cheesecake layer melds beautifully with the sweet, slightly tart strawberries, all topped with that golden, buttery cake crust. It’s a combination that’s truly a winner.
For serving, this dump cake is fantastic warm, right out of the oven, especially when paired with a scoop of vanilla bean ice cream or a dollop of fresh whipped cream. You can also enjoy it chilled, which makes the flavors even more pronounced and gives it a delightful, firm texture. If you’re feeling adventurous, consider some variations! Try adding a swirl of lemon zest to the batter for an extra citrusy zing, or sprinkle some chopped pecans or walnuts over the top before baking for added crunch. Don’t be afraid to experiment with different fruit fillings too – blueberry or raspberry would be divine.
I truly encourage you to give this Strawberry Cheesecake Dump Cake a try. It’s a foolproof recipe that is guaranteed to impress everyone, including yourself. Get ready for rave reviews and empty plates!
Frequently Asked Questions about Strawberry Cheesecake Dump Cake:
Can I make this ahead of time?
Yes, you can absolutely assemble this dump cake ahead of time and refrigerate it before baking. Just cover it tightly with plastic wrap and keep it in the fridge for up to 24 hours. You might need to add a few extra minutes to the baking time if baking from chilled.
What kind of cake mix should I use?
While a classic white or yellow cake mix works wonderfully, a vanilla or even a cream cheese flavored cake mix can enhance the cheesecake element even further. Feel free to get creative!
How do I store leftovers?
Leftover dump cake can be stored in an airtight container in the refrigerator for up to 3-4 days. Reheat individual portions gently in the microwave or oven if desired, or enjoy it cold!
Strawberry Cheesecake Dump Cake
A quick and easy dessert made by layering strawberry pie filling, cream cheese mixture, and cake mix, then baking until golden and bubbly. Perfect served with whipped cream or ice cream.
Ingredients
-
1 can (21 oz) strawberry pie filling
-
1 package (8 oz) cream cheese, softened
-
½ cup granulated sugar
-
1 teaspoon vanilla extract
-
1 box yellow or white cake mix (15.25 oz)
-
½ cup (1 stick) unsalted butter, melted
-
½ cup milk
-
½ teaspoon cinnamon (optional)
-
½ cup chopped pecans or walnuts (optional)
Instructions
-
Step 1
Preheat oven to 350°F (175°C). Grease a 9×13 inch baking dish. -
Step 2
In a medium bowl, beat together the softened cream cheese, granulated sugar, and vanilla extract until smooth. -
Step 3
Spread the strawberry pie filling evenly over the bottom of the prepared baking dish. -
Step 4
Dollop the cream cheese mixture over the strawberry filling. -
Step 5
Sprinkle the dry cake mix evenly over the cream cheese layer. Do not mix. -
Step 6
In a small bowl, whisk together the melted butter and milk. Drizzle this mixture evenly over the dry cake mix. -
Step 7
If desired, sprinkle cinnamon and/or chopped nuts over the top. -
Step 8
Bake for 40-50 minutes, or until the cake topping is golden brown and the filling is bubbly. -
Step 9
Let cool slightly before serving. Serve warm with whipped cream, vanilla ice cream, or fresh strawberries.
Important Information
Nutrition Facts (Per Serving)
It is important to consider this information as approximate and not to use it as definitive health advice.
Allergy Information
Please check ingredients for potential allergens and consult a health professional if in doubt.