Strawberry Swirl Cheesecake Cookie Cups-Delicious Treat
Strawberry Swirl Cheesecake Cookie Cups are the ultimate crowd-pleaser, a delightful fusion of two beloved desserts that’s guaranteed to make your taste buds sing. Imagin extracte the rich, creamy indulgence of cheesecake perfectly swirled into a soft, chewy cookie base, all baked into perfectly portioned, bite-sized cups. It’s no wonder these little gems are so incredibly popular! The magic lies in their irresistible texture contrast: that satisfying cookie crunch giving way to a luxuriously smooth, tangy cheesecake filling, all elevated by the sweet burst of fresh strawberries. These Strawberry Swirl Cheesecake Cookie Cups aren’t just a dessert; they’re an experience, a delightful miniature masterpiece that captures the best of both worlds in every single bite. Get ready to impress yourself and everyone you share them with!
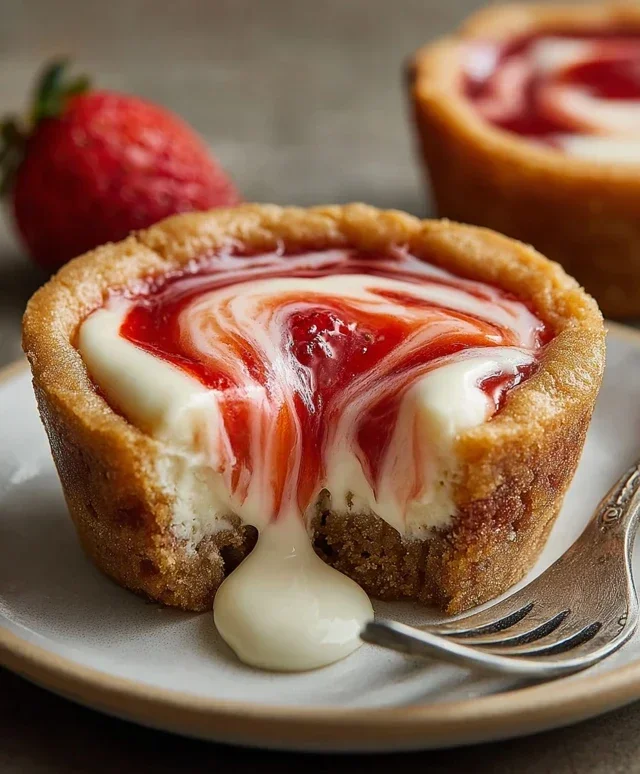
Strawberry Swirl Cheesecake Cookie Cups
Get ready to elevate your dessert game with these incredibly easy and delightfully decadent Strawberry Swirl Cheesecake Cookie Cups! Imagin extracte the comforting sweetness of a sugar cookie embracing a creamy, tangy cheesecake filling, all swirled with vibrant strawberry goodness. These treats are perfect for any occasion, from a casual afternoon pick-me-up to a show-stopping dessert for your next gathering. They’re surprisingly simple to make, requiring minimal fuss and delivering maximum flavor. Forget the hassle of a full-sized cheesecake; these individual cups offer all the deliciousness in a fun, bite-sized format. Let’s dive in and create some magic!
Ingredients:
Preparing the Cookie Cups
The foundation of our delightful dessert starts with a buttery, sweet sugar cookie base. We’ll be using a convenient roll of refrigerated sugar cookie dough, which takes a lot of the guesswork out of the baking process. If you prefer to make your own sugar cookies from scratch, feel free to substitute your favorite recipe for about 2 cups of dough. The key here is to get the dough ready to press into our muffin tin.
First, preheat your oven to 350 degrees Fahrenheit (175 degrees Celsius). This moderate temperature will ensure our cookie cups bake evenly without getting too brown on the edges before the center is cooked. Next, lightly grease a standard 12-cup muffin tin. You can use butter, cooking spray, or even line it with paper muffin liners if you prefer. However, for this recipe, pressing the dough directly into the greased tin yields the best results for creating a sturdy cup.
Now, take your roll of sugar cookie dough and unwrap it. You’ll want to divide the dough evenly among the 12 cups of your muffin tin. A good starting point is to take about 1.5 to 2 tablespoons of dough per cup. Roll each portion into a ball and then press it gently into the bottom and up the sides of each muffin cup, forming a little “cup” or “bowl” shape. Don’t worry if it’s not perfectly smooth; the rustic look adds to the charm. Make sure the dough is pressed up the sides enough to create a good barrier to hold the cheesecake filling. Bake these cookie cups for about 10-12 minutes, or until the edges are lightly golden brown and the centers are just set. They will puff up a bit while baking. Once baked, remove them from the oven and immediately, while they are still warm, use the back of a small spoon or a mini tart tamper to gently press down the centers again. This creates a deeper well for our luscious cheesecake filling and helps prevent the cookie from puffing up too much in the middle. Let these cookie cups cool in the muffin tin for about 5-10 minutes before carefully transferring them to a wire rack to cool completely. This cooling period is crucial to allow the cookie cups to firm up so they don’t break when you add the filling.
Crafting the Creamy Cheesecake Filling
While our cookie cups are cooling, let’s prepare the star of the show: the creamy cheesecake filling. This is where the magic truly happens, blending the tang of cream cheese with the sweetness of sugar and the fragrant warmth of vanilla. Ensure your 8 ounces of cream cheese are truly softened. This means leaving them at room temperature for at least an hour, or even gently microwaving them for a few seconds if you’re short on time. Softened cream cheese is essential for a smooth, lump-free filling.
In a medium bowl, add the softened cream cheese and ¼ cup of granulated sugar. Using an electric mixer (handheld or stand mixer with a paddle attachment), beat these two ingredients together until they are perfectly smooth and creamy. Scrape down the sides of the bowl occasionally to ensure everything is incorporated. Next, add 1 teaspoon of vanilla extract to the mixture. Vanilla extract is a classic flavor enhancer that complements the tangin extractess of the cream cheese beautifully. Beat again until the vanilla is fully combined. The result should be a light, airy, and incredibly smooth cheesecake mixture. Taste a tiny bit – it should be just sweet enough with that signature cheesecake tang.
Assembling the Strawberry Swirl Masterpieces
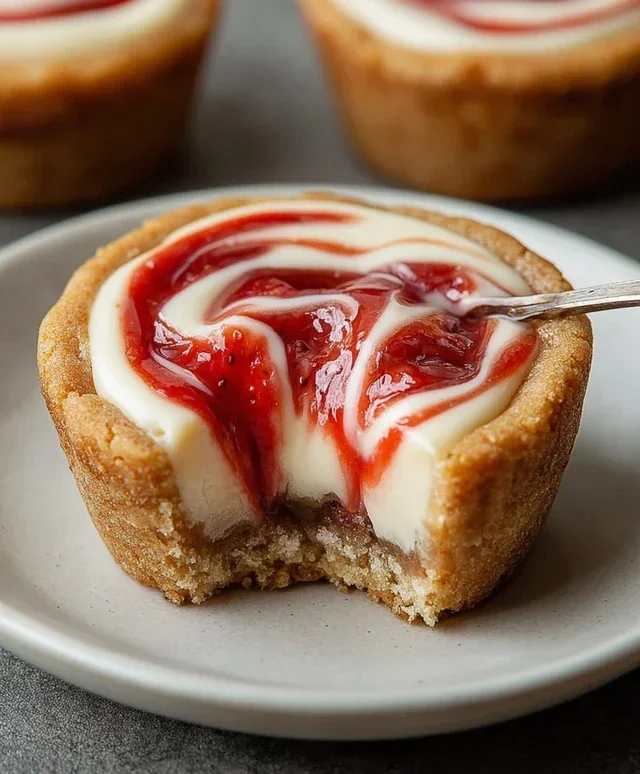
Now for the fun part – assembling these gorgeous Strawberry Swirl Cheesecake Cookie Cups! Once your cookie cups have completely cooled, it’s time to bring them to life. Gently spoon the prepared cheesecake filling into each cooled cookie cup. You want to fill them generously, but not so much that the filling spills over the sides when you swirl the jam. A tablespoon or two per cup should do the trick.
Next, it’s time for the star of the swirl: the strawberry jam. Warm your ⅓ cup of strawberry jam slightly. You can do this by placing it in a small microwave-safe bowl and heating it for about 10-15 seconds, or by placing the jar in a bowl of warm water. Warming the jam makes it more fluid and easier to swirl. Take a small spoon or a toothpick and carefully dollop small amounts of the warmed strawberry jam onto the cheesecake filling in each cookie cup. Then, using the tip of the spoon or a toothpick, gently swirl the jam into the cheesecake filling. Create beautiful, marbled patterns by draggin extractg the spoon or toothpick through the jam and cream cheese. Don’t over-swirl; you want distinct ribbons of strawberry and cheesecake to be visible.
Finishing Touches and Serving
Once all your cookie cups are beautifully swirled, they are ready for their final flourish! If you wish, you can add a fresh strawberry slice on top of each cookie cup for an extra pop of color and fresh fruit flavor. Alternatively, a sprinkle of finely chopped chocolate shavings adds a touch of indulgence. These little garnishes are entirely optional, but they do add to the visual appeal and overall deliciousness.
For the best flavor and texture, I recommend chilling the Strawberry Swirl Cheesecake Cookie Cups in the refrigerator for at least 30 minutes before serving. This allows the cheesecake filling to set up a bit more and melds all the flavors together beautifully. They are best enjoyed chilled and can be stored in an airtight container in the refrigerator for up to 3 days. These delightful little treats are sure to be a crowd-pleaser, offering a delightful combination of textures and flavors in every bite. Enjoy!
Conclusion:
I hope you’re as excited to try these Strawberry Swirl Cheesecake Cookie Cups as I am! These delightful treats perfectly combine the crum extractbly, buttery goodness of a classic cookie with the creamy, tangy richness of cheesecake, all swirled with vibrant strawberry flavor. They’re incredibly easy to make, making them a fantastic option for both begin extractner bakers and experienced pros looking for a crowd-pleasing dessert. The individual portions make them ideal for parties, potlucks, or simply a special treat to enjoy throughout the week. I truly believe these Strawberry Swirl Cheesecake Cookie Cups are a winner for any occasion.
For serving, I love presenting them chilled, letting the flavors meld beautifully. They’re wonderful on their own, but a dollop of fresh whipped cream or a few fresh strawberry slices can elevate them even further. Don’t be afraid to get creative with variations! You could try a blueberry swirl, a raspberry swirl, or even a chocolate chip cookie base with a cheesecake swirl. The possibilities are endless, and I encourage you to experiment and find your perfect combination. Give these a go – I’m confident they’ll become a new favorite in your recipe collection!
Frequently Asked Questions:
Can I make these ahead of time?
Absolutely! These Strawberry Swirl Cheesecake Cookie Cups can be made up to two days in advance. Store them in an airtight container in the refrigerator. They are delicious served chilled!
What if I don’t have fresh strawberries?
No problem at all! You can easily substitute with good quality strawberry jam or preserves. Just be sure to reduce the amount of sugar in the cheesecake filling slightly if your jam is very sweet, and warm the jam slightly to make it easier to swirl.
How do I prevent the cookie cups from sticking to the muffin tin?
Greasing and flouring your muffin tin thoroughly is key. You can also use non-stick cooking spray with flour. For extra insurance, consider using silicone muffin liners, which often make removal a breeze.
Strawberry Swirl Cheesecake Cookie Cups
Delightful cookie cups featuring a creamy cheesecake filling swirled with sweet strawberry jam, all baked in a tender sugar cookie base.
Ingredients
-
1 roll (16.5 oz) refrigerated sugar cookie dough
-
8 oz cream cheese, softened
-
1/4 cup granulated sugar
-
1 tsp vanilla extract
-
1/3 cup strawberry jam, warmed slightly
-
Fresh strawberries (optional)
-
Chocolate shavings (optional)
Instructions
-
Step 1
Preheat oven to 375°F (190°C). Grease a mini muffin tin. -
Step 2
Press about 1 tablespoon of sugar cookie dough into the bottom and up the sides of each mini muffin cup. -
Step 3
In a medium bowl, beat together the softened cream cheese and granulated sugar until smooth. Stir in the vanilla extract. -
Step 4
Spoon about 1 teaspoon of the cream cheese mixture into each cookie cup. -
Step 5
Drizzle about 1/2 teaspoon of warmed strawberry jam over the cream cheese mixture in each cup. -
Step 6
Using a toothpick or skewer, gently swirl the jam into the cream cheese for a marbled effect. -
Step 7
Bake for 12-15 minutes, or until the edges of the cookie cups are golden brown. -
Step 8
Let the cookie cups cool in the tin for a few minutes before transferring them to a wire rack to cool completely. Garnish with fresh strawberries or chocolate shavings, if desired.
Important Information
Nutrition Facts (Per Serving)
It is important to consider this information as approximate and not to use it as definitive health advice.
Allergy Information
Please check ingredients for potential allergens and consult a health professional if in doubt.