Cherry Pie Bombs – Irresistible Mini Desserts
Cherry Pie Bombs are about to revolutionize your dessert game. Forget everything you thought you knew about individual treats; these are bite-sized explosions of pure joy, packing all the nostalgic comfort of a classic cherry pie into a perfectly portable, utterly irresistible package. We all have those cravings for something sweet, something familiar, something that feels like a warm hug from Grandma’s kitchen. That’s exactly what Cherry Pie Bombs deliver, but with an exciting twist that makes them incredibly fun to make and even more exhilarating to devour. What makes them so special, you ask? It’s the delightful contrast of flaky pastry giving way to a lusciously sweet and slightly tart cherry filling, all contained in a shape that’s as adorable as it is delicious. Get ready to impress your friends, satisfy your sweet tooth, and experience the magic of Cherry Pie Bombs for yourself.
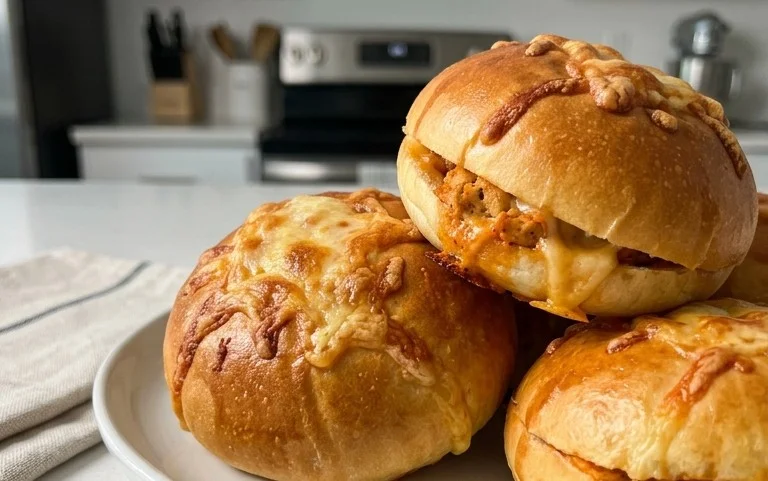
Cherry Pie Bombs
Get ready to experience a delightful explosion of sweet, tart cherry goodness wrapped in a fluffy, golden biscuit crust! These Cherry Pie Bombs are ridiculously easy to make and are guaranteed to be a hit at any gathering, or simply for a special treat for yourself. Imagin extracte a bite-sized version of your favorite classic cherry pie, but even more fun and convenient. They’re perfect for parties, potlucks, or even just a cozy afternoon snack. The crispy exterior gives way to a warm, gooey cherry filling, all coated in a luscious, sweet glaze. Let’s dive into what you’ll need to create these irresistible treats.
Ingredients:
Getting Started: Preparing the Filling and Dough
The foundation of our Cherry Pie Bombs lies in the simplicity of the ingredients, but the execution is where the magic happens. First, we need to get our cherry filling ready. Open your can of cherry pie filling. You don’t need to do anything fancy here; we’re going to use it just as it is. The thick, syrupy cherry mixture is precisely what we’re looking for to create that burst of flavor in the center of each bomb.
Next, let’s address the biscuit dough. Gently unroll your Grands “Big” biscuits. Be careful not to overwork the dough, as this can lead to tougher bombs. We want them to be as light and flaky as possible. You’ll notice they are already separated into individual biscuit rounds. We’re going to use these as our doughy casings. For larger bombs, you can gently press two biscuit rounds together to create a thicker dough layer, ensuring the filling doesn’t escape during frying. However, for more traditional bite-sized bombs, a single biscuit layer is usually sufficient.
Assembling the Cherry Pie Bombs
Now comes the fun part: assembling these little pockets of joy! We’ll start by taking one biscuit round and gently flattening it slightly. Don’t press it too thin, as we still want some substance to hold the filling. On the center of each flattened biscuit, spoon a generous dollop of the cherry pie filling. You want enough to get a good cherry flavor in every bite, but not so much that it will ooze out during the cooking process. Think of it as being mindful of the structural integrity of our future bombs.
Once you have your filling in place, it’s time to seal them up. Take another biscuit round and place it on top of the filling. Now, carefully pinch the edges of the two biscuit rounds together to create a seal. Really take your time here to ensure a good, tight seal. This is crucial to prevent the hot oil from seeping into the biscuit and the cherry filling from escaping. You can use your fingers to crimp the edges, or even use the tines of a fork for a decorative and secure seal. If you’re using the two-biscuit method for thicker bombs, make sure the outer edges of both biscuits are well-joined.
Frying to Golden Perfection
Now it’s time to transform our assembled dough into delicious, golden-brown bombs. In a deep, heavy-bottomed pot or Dutch oven, pour in enough vegetable oil to come about 2-3 inches up the sides. Heat the oil over medium-high heat until it reaches approximately 350-375 degrees Fahrenheit (175-190 degrees Celsius). It’s important to maintain this temperature range for optimal frying. If the oil is too cool, the bombs will absorb too much grease and become soggy. If it’s too hot, they’ll brown too quickly on the outside before the inside is cooked through. You can test the oil by dropping a tiny piece of biscuit dough; it should sizzle and float to the surface immediately.
Carefully, and I stress carefully, place a few assembled cherry pie bombs into the hot oil, ensuring you don’t overcrowd the pot. Overcrowding will lower the oil temperature and lead to uneven cooking. Fry the bombs for about 2-3 minutes per side, or until they are beautifully golden brown and puffed up. Use a slotted spoon or spider strainer to gently turn them over. This will ensure even cooking and that lovely, crispy exterior. Once they’re perfectly golden, remove them from the oil and place them on a wire rack set over a baking sheet to drain any excess oil. This step is vital for achieving that satisfying crispness.
Whipping Up the Glaze and Finishing Touches
While our Cherry Pie Bombs are cooling slightly, let’s prepare the luscious glaze that will take them to the next level. In a medium bowl, whisk together the powdered sugar, milk, and light corn syrup until you have a smooth, pourable glaze. The corn syrup is key here, as it will give the glaze a lovely sheen and prevent it from hardening too much. You can adjust the consistency by adding a little more milk if it’s too thick, or more powdered sugar if it’s too thin.
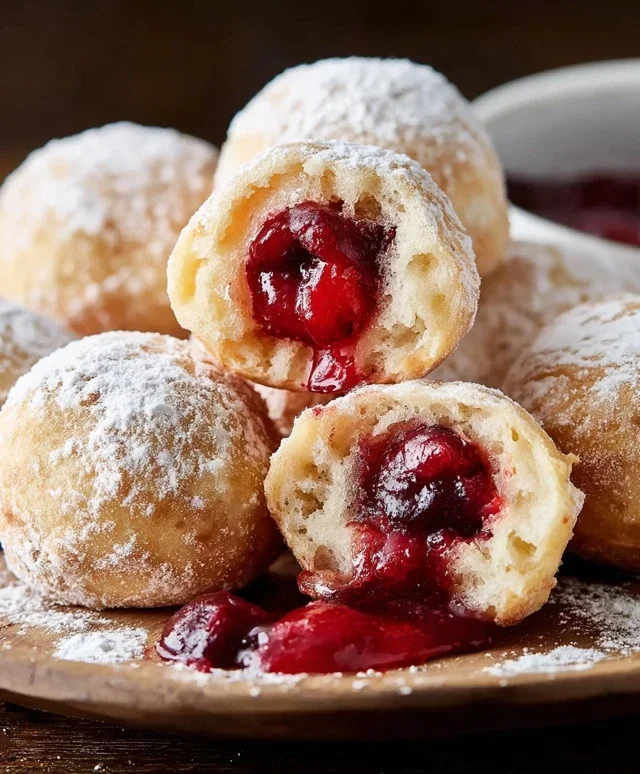
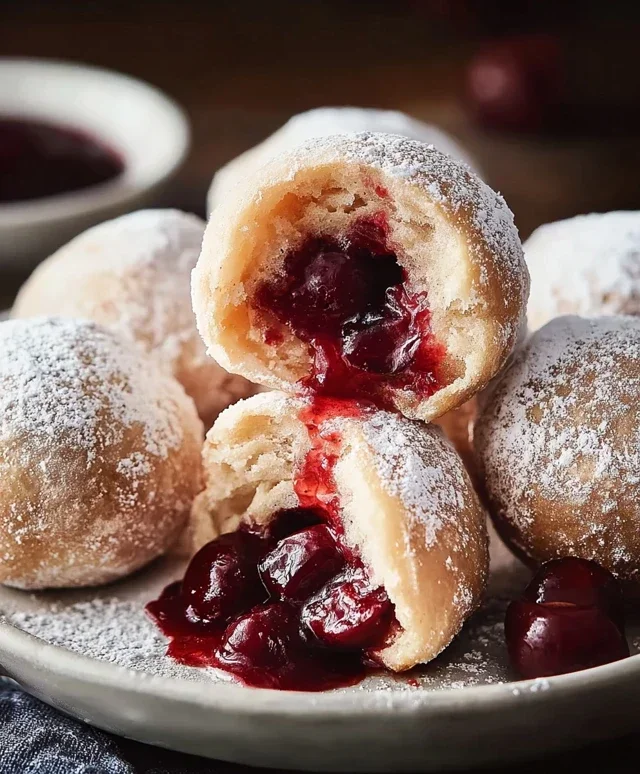
Once the fried bombs have cooled for a few minutes (you don’t want them piping hot, but still warm enough to absorb the glaze), it’s time for the final flourish. Drizzle the glaze generously over the warm Cherry Pie Bombs. You can use a spoon for a rustic look or a piping bag for a more refined presentation. The glaze will set slightly as it cools, creating a delightful sweet coating. Serve these warm for the ultimate gooey, crispy, and cherry-filled experience. Enjoy every single bite!
Conclusion:
There you have it! My recipe for these delightful Cherry Pie Bombs is a guaranteed crowd-pleaser. They’re incredibly simple to make, transforming a classic cherry pie into adorable, portable, and utterly irresistible bite-sized treats. The flaky, buttery crust encasing a burst of sweet and tangy cherry filling is pure bliss. Whether you’re a seasoned baker or just starting out, these cherry pie bombs are a fantastic way to impress and satisfy. I truly encourage you to give them a try – you won’t regret it!
These little gems are wonderfully versatile. Serve them warm as a comforting dessert with a scoop of vanilla ice cream or a dollop of whipped cream for an extra touch of indulgence. They also make a fantastic addition to any potluck, picnic, or holiday gathering. For some fun variations, consider adding a pinch of cinnamon or nutmeg to the cherry filling for added warmth, or perhaps a sprinkle of almond extract for a sophisticated twist. You could even try a sprinkle of sugar crystals on top before baking for a delightful crunch.
Frequently Asked Questions:
Can I use fresh cherries instead of frozen?
Absolutely! If using fresh cherries, you’ll want to pit them and may need to reduce the cooking time slightly to account for less moisture. Ensure they are thoroughly drained before adding them to your filling mixture.
How should I store leftover Cherry Pie Bombs?
Store any leftover cherry pie bombs in an airtight container at room temperature for up to 2 days, or in the refrigerator for up to 4 days. Reheat them gently in a toaster oven or conventional oven for the best texture.
Cherry Pie Bombs
Delicious fried biscuit bites filled with sweet cherry pie filling and drizzled with a creamy glaze.
Ingredients
-
Vegetable oil, for frying
-
16.3 ounces Grands “Big” biscuits, flaky
-
21 ounces cherry pie filling
-
2 cups powdered sugar
-
1/4 cup milk
-
1 tablespoon light corn syrup
Instructions
-
Step 1
Open the Grands “Big” biscuits and separate them. Flatten each biscuit slightly with your hands. -
Step 2
Spoon about 1-2 tablespoons of cherry pie filling into the center of each flattened biscuit. Be careful not to overfill. -
Step 3
Carefully bring the edges of the biscuit dough up and pinch them together to fully enclose the cherry filling, forming a ball or “bomb” shape. Ensure there are no gaps. -
Step 4
Heat vegetable oil in a deep skillet or pot to about 350°F (175°C). Carefully place the cherry pie bombs into the hot oil, a few at a time, ensuring not to overcrowd the pan. -
Step 5
Fry the bombs for about 2-3 minutes per side, or until golden brown and puffed up. Use tongs to turn them gently. -
Step 6
Remove the fried bombs from the oil and place them on a paper towel-lined plate to drain excess oil. -
Step 7
While the bombs are still warm, prepare the glaze. In a small bowl, whisk together powdered sugar, milk, and light corn syrup until smooth and drizzly. -
Step 8
Drizzle the glaze generously over the warm cherry pie bombs.
Important Information
Nutrition Facts (Per Serving)
It is important to consider this information as approximate and not to use it as definitive health advice.
Allergy Information
Please check ingredients for potential allergens and consult a health professional if in doubt.