Tri Tip Two Ways- Delicious Oven & Grill Recipes
Tri tip is one of those cuts of beef that truly deserves the spotlight. There’s something incredibly satisfying about a perfectly cooked tri tip, with its tender, juicy interior and a beautifully rendered, flavorful crust. It’s a crowd-pleaser for a reason – it’s approachable for home cooks yet delivers restaurant-quality results that impress everyone at the table. What makes this cut so special? Its marbling, its versatility, and the sheer deliciousness that comes from a well-executed preparation. That’s why I’m so excited to share not just one, but two incredible ways to prepare tri tip. Whether you’re craving that classic grilled perfection or looking for a melt-in-your-mouth roasted delight, this article has you covered. Get ready to elevate your beef game with these fantastic tri tip recipes.
Tri Tip (2 Ways)
The tri-tip roast, a triangular cut from the bottom sirloin of the cow, is an incredibly versatile and flavorful piece of meat. It’s known for its lean yet tender texture and its ability to absorb marinades beautifully. Today, we’re going to explore two fantastic ways to prepare this gem: a classic, robustly seasoned roast, and a quick, pan-seared rendition perfect for weeknight dinners or when you want to enjoy that delicious tri-tip flavor with less fuss. Both methods highlight the inherent deliciousness of the tri-tip, proving it’s a cbeef hampion cut no matter how you cook it.
Ingredients:
Method 1: The Classic Oven-Roasted Tri Tip
This method is all about building deep flavor and achieving a perfectly juicy interior with a beautiful, caramelized crust. It’s ideal for when you have a bit more time and want a showstopper for a family meal or gathering.
Step 1: Prepare the Rub and the Roast
First, let’s get our flavor bomb ready. In a small bowl, combine the garlic salt, Lawry’s seasoning salt, kosher salt, black pepper, sugar, garlic powder, and dried parsley. Mix these ingredients thoroughly to ensure an even distribution of spices. The sugar, while a small amount, plays a crucial role in caramelization, helping to create that irresistible crust. Next, pat your tri-tip roast completely dry with paper towels. This is a very important step for achieving a good sear and a nicely browned exterior, as moisture on the surface will steam the meat rather than sear it. Once dry, generously coat the entire tri-tip roast with the olive oil. This oil acts as a binder for our dry rub, helping it adhere evenly to the surface of the meat.
Step 2: Apply the Rub and Let it Marinate
Now, it’s time to season. Sprinkle the prepared spice rub evenly over all sides of the olive oil-coated tri-tip roast. Gently press the rub into the meat with your hands to make sure it sticks well. For the best flavor development, it’s highly recommended to let the seasoned roast sit at room temperature for at least 30 minutes, or even better, refrigerate it, uncovered, on a rack set over a baking sheet for 2-4 hours (or even overnight). This allows the salt to begin extract its work, tenderizing the meat and drawing out moisture to create a concentrated, flavorful crust. If you refrigerate it, remember to bring it back to room temperature for about an hour before cooking.
Step 3: Sear and Roast
Preheat your oven to 400°F (200°C). Place the seasoned tri-tip roast, fat side up if it has a prominent fat cap, on a wire rack set inside a baking sheet. This setup allows air to circulate around the roast, ensuring even cooking and a beautifully browned exterior. Sear the roast in the preheated oven for about 20-25 minutes. You’re looking for an internal temperature of around 125°F (52°C) for medium-rare.
Step 4: Rest and Slice
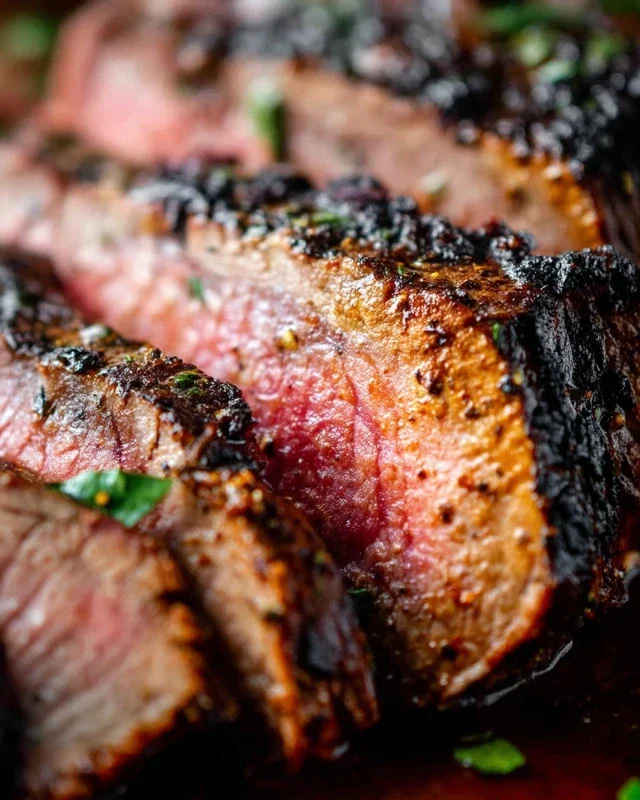
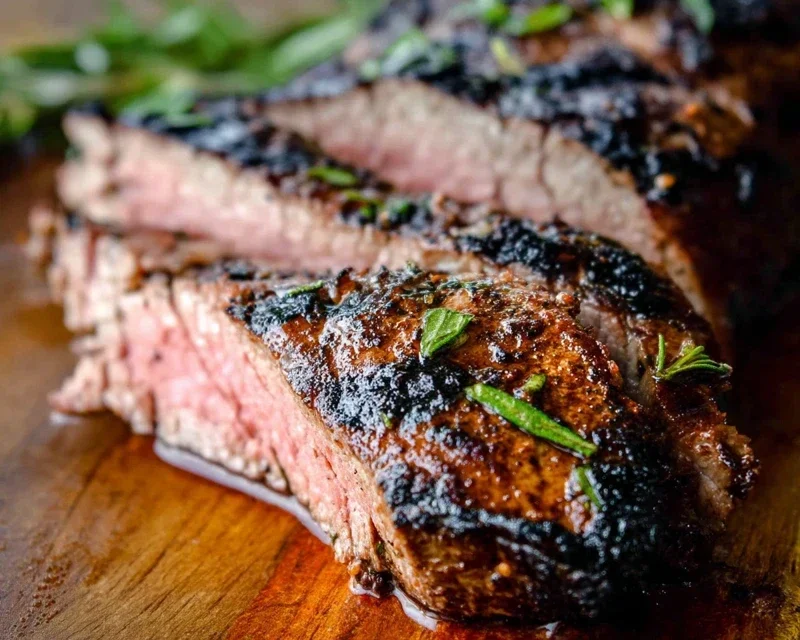
Once the roast reaches your desired internal temperature (use an instant-read thermometer inserted into the thickest part of the roast, avoiding bone if any), remove it from the oven. Tent the roast loosely with aluminum foil and let it rest for at least 10-15 minutes. This resting period is absolutely critical. It allows the juices, which have been pushed to the center during cooking, to redistribute throughout the meat. If you slice too soon, all that delicious moisture will run out onto your cutting board. After resting, slice the tri-tip against the grain into thin strips for maximum tenderness.
Method 2: Quick Pan-Seared Tri Tip
This method is perfect for when you’re craving that delicious tri-tip flavor but are short on time. It delivers a fantastic sear and juicy interior with minimal effort.
Step 1: Prepare and Season
Start by ensuring your tri-tip is thawed if it was frozen. Similar to the roasted method, pat the tri-tip thoroughly dry with paper towels. You can use the same spice rub as described above, or a simpler rub of just salt, pepper, and garlic powder if you prefer. Coat the roast evenly with the seasoning. Let the seasoned roast sit at room temperature for about 20-30 minutes while you prepare your pan.
Step 2: Sear on the Stovetop
Heat 1-2 tablespoons of olive oil in a heavy-bottomed skillet, such as cast iron, over medium-high heat until it shimmers. Carefully place the tri-tip roast into the hot skillet. Sear for approximately 3-5 minutes per side, until a deep brown crust forms. The exact time will depend on the thickness of your roast. For a more tender result, you can finish cooking this in the oven after searing, or continue cooking it in the skillet, turning occasionally, until it reaches your desired internal temperature.
Step 3: Finish Cooking and Rest
If you’re finishing on the stovetop, reduce the heat to medium-low and continue to cook, turning the roast every few minutes, until an instant-read thermometer registers your desired temperature (around 125°F for medium-rare). If you opted for the oven finish, after searing both sides, transfer the skillet (if oven-safe) or the roast to a baking sheet and finish in a preheated 375°F (190°C) oven until it reaches the desired internal temperature. As with the roasted method, it’s imperative to let the pan-seared tri-tip rest for at least 5-10 minutes before slicing against the grain. This allows the juices to settle, ensuring a more succulent bite.
Both of these methods showcase the incredible flavor and texture of the tri-tip. Whether you have time for a slow roast or need a quick sear, this cut is sure to impress. Enjoy!
Conclusion:
So there you have it – two fantastic ways to prepare a delicious Tri Tip! Whether you opt for the classic grill or the hands-off oven roast, this cut of beef is incredibly versatile and rewarding to cook. Its rich, beefy flavor and tender texture make it a crowd-pleaser every time. I love how this recipe allows you to achieve impressive results with relatively simple techniques, making it perfect for both weeknight dinners and weekend entertaining. Don’t be afraid to experiment with your favorite rubs and sauces to truly make it your own. I highly encourage you to give one, or both, of these Tri Tip preparations a try soon!
For serving, think classic steakhouse sides like roasted potatoes, creamed spinach, or a fresh green salad. However, this Tri Tip is also fantastic sliced thin for sandwiches, tacos, or even a hearty steak salad. Feel free to adjust the cooking times based on your desired level of doneness – a meat thermometer is your best friend here!
Frequently Asked Questions:
What is Tri Tip?
Tri tip is a triangular cut of beef from the bottom sirloin. It’s known for its excellent flavor and tender texture when cooked properly, especially when not overcooked.
Can I marinate Tri Tip?
Absolutely! Tri tip takes wonderfully to marinades. A simple marinade of olive oil, garlic, soy sauce, and herbs can add an extra layer of flavor and tenderness. Marinate for at least 4 hours, or up to overnight, before cooking.
What’s the best way to slice Tri Tip?
Always slice your Tri Tip against the grain. You’ll notice the grain runs in different directions on different parts of the roast, so pay attention to identify it. Slicing against the grain ensures maximum tenderness in every bite.
Tri Tip (2 Ways)
A versatile tri tip roast prepared with two distinct flavor profiles, offering a delicious and adaptable meal.
Ingredients
-
2 & 1/2 pound tri tip roast
-
1 & 1/2 teaspoons garlic salt
-
1 tablespoon Lawry’s seasoning salt
-
1 & 1/2 teaspoons kosher salt (Diamond Crystal)
-
1 teaspoon black pepper
-
1/2 teaspoon sugar
-
2 teaspoons garlic powder
-
1 tablespoon dried or fresh parsley
-
1/4 cup olive oil
Instructions
-
Step 1
Preheat your oven to 350°F (175°C) or prepare your grill for medium-high heat. Pat the tri tip dry with paper towels. -
Step 2
For Way 1 (Classic Seasoning): In a small bowl, combine 1 & 1/2 teaspoons garlic salt, 1 tablespoon Lawry’s seasoning salt, 1 & 1/2 teaspoons kosher salt, 1 teaspoon black pepper, 1/2 teaspoon sugar, and 2 teaspoons garlic powder. Rub this mixture evenly over the entire tri tip roast. -
Step 3
For Way 2 (Herb Marinade): In a separate bowl, whisk together 1/4 cup olive oil, 1 tablespoon dried or fresh parsley, 1 teaspoon garlic salt, 1/2 teaspoon black pepper, and 1/4 teaspoon sugar. Reserve the Lawry’s seasoning salt and kosher salt for Way 1. -
Step 4
Sear the tri tip: If oven-roasting, heat 1 tablespoon of olive oil in an oven-safe skillet over high heat and sear the roast for 2-3 minutes per side until browned. If grilling, sear directly over high heat for 2-3 minutes per side. -
Step 5
Apply the chosen seasoning or marinade. If using Way 2, brush the herb marinade over the seared roast. -
Step 6
Cook the tri tip: For oven-roasting, place the skillet in the preheated oven. For grilling, move the roast to indirect heat. Cook to your desired internal temperature (130-135°F for medium-rare, 135-140°F for medium). Use a meat thermometer. -
Step 7
Once cooked, remove the tri tip from the heat and let it rest for 10-15 minutes before slicing against the grain. If you chose Way 1, you can use the remaining Lawry’s seasoning salt and kosher salt to lightly season the roast after resting, if desired.
Important Information
Nutrition Facts (Per Serving)
It is important to consider this information as approximate and not to use it as definitive health advice.
Allergy Information
Please check ingredients for potential allergens and consult a health professional if in doubt.