Campfire Grilled Nachos- Easy Crowd-Pleaser Recipe
Campfire grilled nachos are more than just a snack; they’re an experience. Imagin extracte this: the crackling flames of a campfire, the crisp night air, and the irresistible aroma of melted cheese and savory toppings wafting towards you. It’s the ultimate outdoor indulgence, a dish that embodies the spirit of adventure and togetherness. There’s something undeniably magical about these campfire grilled nachos. They take a beloved classic and elevate it, transforming simple ingredients into a glorious, gooey masterpiece cooked under the open sky. The smoky char from the grill adds a depth of flavor that’s simply unattainable in a kitchen. This recipe isn’t just about the delicious outcome; it’s about the joy of creation, the shared anticnon-alcoholic ipation, and the pure, unadulterated pleasure of diggin extractg into a plate of perfection while stars twinkle above.
What Makes Campfire Grilled Nachos So Special?
The smoky infusion and communal joy are unmatched.
Campfire Grilled Nachos
There’s something undeniably magical about cooking outdoors, and when you combine that with the irresistible allure of gooey, cheesy nachos, you’ve got a recipe for pure outdoor bliss. Forget the oven, ditch the microwave – we’re taking these bad boys to the campfire! Campfire grilled nachos are a fantastic way to feed a hungry crew while enjoying the great outdoors. They’re customizable, incredibly satisfying, and surprisingly easy to pull off with a little planning and a good campfire. Get ready to impress your fellow campers with this smoky, cheesy masterpiece.
Ingredients:
Prep Work: Setting the Stage for Campfire Success
Before you even think about heading to the campfire, a bit of prep at home will make the cooking process at the campsite a breeze. You want to minimize chopping and dicing once you’re out in the elements, especially if the wind is picking up.
Start by pre-cooking your ground meat. Brown it in a skillet over medium-high heat until no pink remains. Drain off any excess grease. While it’s still hot, stir in the taco seasoning and about ¼ cup of water. Let it simmer for a few minutes until the sauce has thickened and coated the meat. This step ensures your meat is flavorful and ready to go, preventing you from having to manage raw meat and seasoning packets at the campsite.
Next, prepare your other toppings. Dice your tomatoes and onions, mince your chilis or jalapeños, and get your beans ready. If you’re planning to mash avocado into guacamole, do that now and keep it covered with plastic wrap pressed directly onto the surface to prevent browning. Having everything chopped and ready in separate containers or resealable bags will make assembling your nachos at the campfire a quick and enjoyable experience. Don’t forget to rinse and drain your beans if you’re using canned ones; this helps reduce the sodium content and any “canned” taste.
Cooking the Campfire Grilled Nachos
Now for the fun part! Getting your campfire ready is key. You’re looking for a nice bed of hot embers rather than roaring flames. The even, sustained heat from the coals is what will melt your cheese perfectly without scorching your chips. If your fire is too hot or still has large flames, let it burn down a bit. You can test the heat by holding your hand about six inches above the coals; if you can only hold it there for 3-4 seconds, it’s probably a good temperature for cooking.
Step 1: Building the Nacho Base
You’ll need a heat-safe surface for your nachos. A cast-iron skillet or a pie tin works wonderfully. If you don’t have either, a heavy-duty aluminum foil packet can also do the trick, though a skillet will give you more control and even cooking.
Spread a generous layer of your sturdy tortilla chips evenly across the bottom of your chosen cooking vessel. Don’t overcrowd them; you want to ensure all the chips get a chance to melt into cheesy goodness. Leave a little bit of space around the edges if you’re using a skillet, as the heat can sometimes be more intense there.
Step 2: Layering on the Goodness
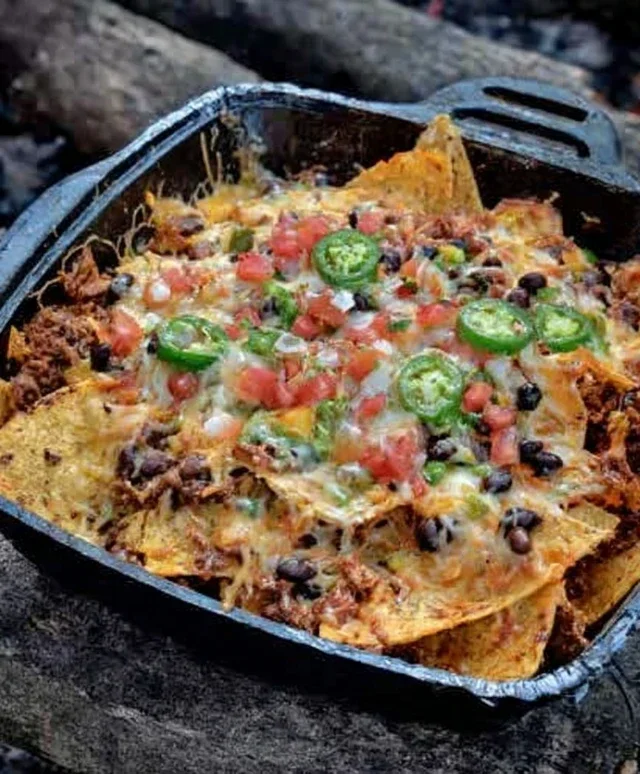
Now, it’s time to add those delicious layers. Spoon your seasoned ground meat evenly over the tortilla chips. Make sure to distribute it so every chip gets some savory flavor. Next, scatter your drained beans over the meat. If you’re using refried beans, you can dollop them on or spread them in a thin layer. Don’t forget to add your diced tomatoes and finely diced onions. Finally, sprinkle the diced green chilis or minced jalapeños over the top. These add a wonderful zesty kick and a hint of smoky flavor. Remember, you can always add more heat with your toppings later, so don’t go too crazy with the peppers if you’re unsure about spice levels.
Step 3: The Cheesy Meltdown
This is where the magic happens! Generously sprinkle your shredded cheese blend all over the top of your layered ingredients. You want enough cheese to create that glorious, gooey, stretchy pull that nachos are famous for. Cover the entire surface, letting some of the cheese tumble down into the nooks and crannies. The more cheese, the better, in my opinion!
Step 4: Grilling Over the Embers
Carefully place your skillet or foil packet directly onto the hot embers of your campfire. You can also place it on a grate if your campfire setup has one. The goal here is gentle, even heat. Keep an eye on them constantly. You’re looking for the cheese to be completely melted and bubbly, and for the chips on the bottom to be warmed through. This usually takes about 5-10 minutes, depending on the heat of your fire and how close your nachos are to the coals. Rotate the skillet or packet every few minutes to ensure even cooking and prevent any one side from burning. If you notice one spot cooking too quickly, lift the skillet slightly or move it to a cooler part of the embers.
Step 5: The Grand Finnon-alcoholic ale and Serving
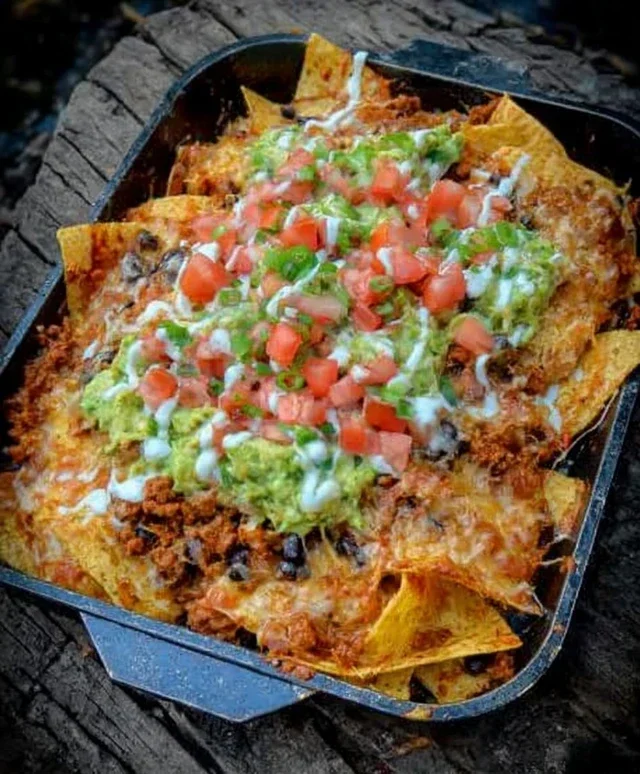
Once the cheese is perfectly melted and bubbling, carefully remove your campfire grilled nachos from the heat. Use thick oven mitts or heat-resistant gloves for this! Let them sit for just a minute or two so the cheese isn’t scalding hot. Now, it’s time for the final touches. Spoon on your diced avocado or dollops of guacamole. Add a dollop of sour cream, a spoonful of your favorite salsa, and a sprinkle of fresh cilantro, if you like.
Serve immediately directly from the skillet or foil packet for the ultimate communal campfire experience. Grab some forks or extra napkins and dig in! The smoky flavor from the campfire, combined with the melted cheese and savory toppings, makes these nachos an absolute showstopper. Enjoy the cheers of your fellow campers as they savor this delicious outdoor creation.
Conclusion:
There you have it – the ultimate guide to crafting delicious campfire grilled nachos! This recipe is an absolute winner because it takes a beloved comfort food and elevates it with the smoky, irresistible char from an open flame. It’s the perfect way to impress your friends and family on your next outdoor adventure, offering a satisfying and interactive meal that’s incredibly easy to assemble. Don’t be intimidated by cooking over a fire; with a little practice, you’ll be a campfire gourmet in no time. These nachos are fantastic served straight from the grill, perfect for sharing around the fire as the stars come out. For a heartier meal, consider adding seasoned ground beef or shredded chicken. For a vegetarian option, load them up with black beans, corn, and diced peppers. The possibilities are truly endless when it comes to customizing your perfect plate of campfire grilled nachos.
I truly hope you’ll give this recipe a try on your next camping trip or backyard bonfire. It’s an experience that brings people together and creates lasting memories (and delicious food!). Happy grilling!
Frequently Asked Questions:
What kind of pan should I use for campfire grilled nachos?
A cast-iron skillet is your best friend here! It distributes heat evenly and can withstand the direct heat of the campfire. A sturdy, oven-safe baking sheet or a foil-lined cast-iron grill basket will also work well.
How do I prevent my nachos from burning?
The key is managin extractg your heat. Place your skillet or pan on a grate positioned over medium heat, rather than directly in the roaring flames. You can also elevate the grate higher for less intense heat. Keep a close eye on them and rotate the pan if necessary to ensure even cooking.
Can I make these ahead of time?
You can prep most of your ingredients – chopping veggies, shredding cheese, and preparing any meats – ahead of time. However, it’s best to assemble the nachos just before grilling to prevent the chips from getting soggy.
Campfire Grilled Nachos
Easy and delicious campfire grilled nachos, perfect for a quick and satisfying outdoor meal.
Ingredients
-
tortilla chips
-
ground pork
-
taco seasoning
-
black beans
-
shredded cheddar cheese
-
diced tomatoes
-
diced onion
-
diced avocado
-
sliced jalapenos
Instructions
-
Step 1
In a skillet over the campfire, brown the ground pork with the taco seasoning. Drain any excess grease. -
Step 2
Heat the black beans in a separate small pot or directly in the skillet, ensuring they are warm. -
Step 3
Arrange a layer of tortilla chips on a cast-iron skillet or a sturdy, oven-safe pan suitable for grilling. -
Step 4
Spoon the seasoned ground pork and warmed black beans over the tortilla chips. -
Step 5
Generously sprinkle shredded cheddar cheese over the meat and beans. -
Step 6
Place the skillet with the nachos over indirect heat on the campfire grill grates, or carefully place directly over low coals, until the cheese is melted and bubbly. This will take approximately 5-10 minutes. -
Step 7
Carefully remove the skillet from the campfire. Top the hot nachos with diced tomatoes, diced onion, sliced jalapenos, and diced avocado.
Important Information
Nutrition Facts (Per Serving)
It is important to consider this information as approximate and not to use it as definitive health advice.
Allergy Information
Please check ingredients for potential allergens and consult a health professional if in doubt.