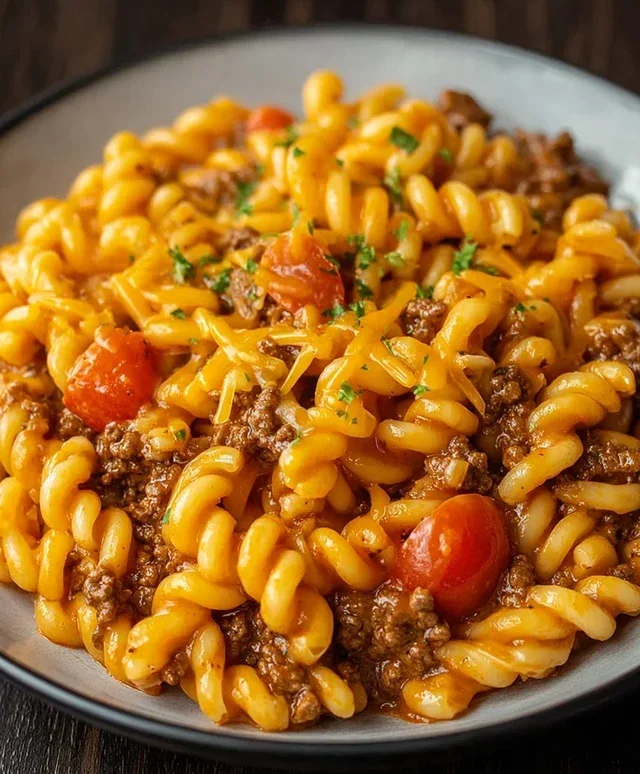
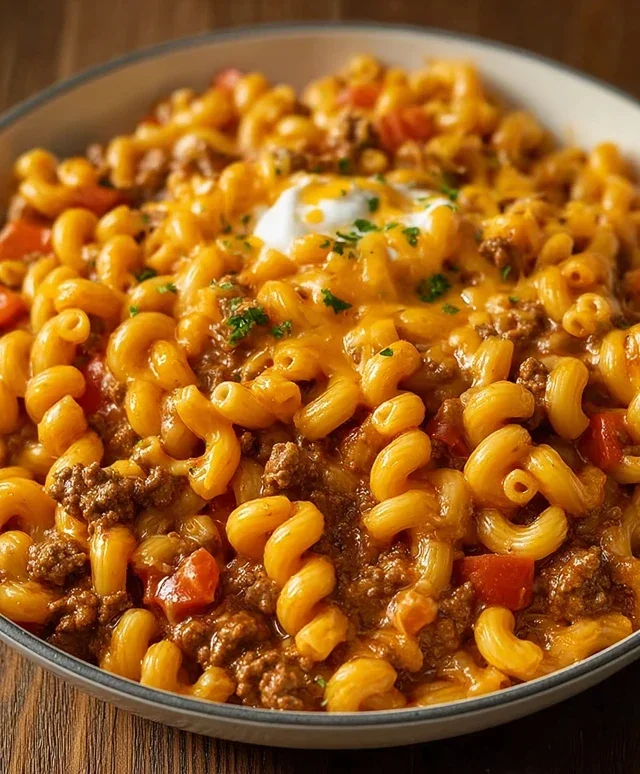
Easy Cheesy Beef Taco Pasta Recipe- Quick Dinner
Cheesy Beef Taco Pasta is the ultimate comfort food mashup, and trust me, once you try it, you’ll understand why it’s become a family favorite in my kitchen. It’s that magical collision of two beloved classics: the zesty, savory flavors of your favorite tacos and the hearty, satisfying embrace of pasta. What’s not to adore about that? We’re talking about tender ground beef, infused with taco seasoning, swirled together with perfectly cooked pasta, and then, the pièce de résistance, smothered in a melty, glorious blanket of cheese. This isn’t just dinner; it’s an experience. It’s the weeknight savior you’ve been dreaming of, delivering maximum flavor with minimal fuss. Get ready to impress yourself and everyone at your table with this incredibly delicious Cheesy Beef Taco Pasta.
Why You’ll Love This Dish
This Cheesy Beef Taco Pasta is more than just a meal; it’s a flavor fiesta that hits all the right notes. We’ve all been there, craving something that’s both deeply satisfying and bursting with vibrant taste. That’s exactly what this dish delivers. The familiar warmth of pasta combined with the bold, zesty kick of taco seasoning creates a harmonious blend that’s simply irresistible. It’s the kind of food that brings smiles to faces and makes everyone ask for seconds. Plus, it’s wonderfully versatile, allowing you to customize it to your spice preference and even add your favorite taco toppings. It’s a win-win for busy nights and weekend indulgence alike!
Get Ready to Make It!
Cheesy Beef Taco Pasta
Get ready to revolutionize your weeknight dinners with this incredibly easy and ridiculously delicious Cheesy Beef Taco Pasta! If you’re a fan of tacos and you’re a fan of pasta, then this dish is your new best friend. It combines all the craveable flavors of your favorite tacos – savory seasoned beef, zesty Rotel, and of course, that irresistible cheesy goodness – all melded together in a comforting pasta dish. It’s the ultimate comfort food that’s perfect for busy evenings, family gatherings, or even just a cozy night in. Forget complicated steps and fancy techniques; this recipe is designed for maximum flavor with minimal fuss.
Ingredients:
Cooking Instructions:
Let’s get cooking! This recipe is designed to be straightforward and satisfying. We’ll be building layers of flavor, starting with browning the beef and then bringin extractg everything together for a wonderfully creamy and cheesy finish.
Step 1: Brown the Ground Beef
The first step to achieving that deep, savory base for our taco pasta is to properly brown the ground beef. Grab a large, sturdy pot or a Dutch oven and place it over medium-high heat. Add the entire 3 pounds of ground beef to the hot pot. Don’t overcrowd the pot; if your pot isn’t big enough, you might consider browning the beef in two batches to ensure it browns evenly rather than steams. Use a spoon or spatula to break up the meat as it starts to cook. We want nice, separated pieces of browned beef, not a giant clump. Continue to cook and stir the beef until it is thoroughly browned and no pink remains. This process usually takes about 8-10 minutes. Once the beef is nicely browned, it’s time to drain off any excess grease. Tilt the pot carefully over a sink with a paper towel in the drain to catch the grease, or use a fine-mesh sieve. Getting rid of that extra fat will result in a less greasy, more enjoyable final dish.
Step 2: Season the Beef and Add the Taco Flavor
Now that our beef is beautifully browned and drained, it’s time to infuse it with those classic taco flavors. Sprinkle the contents of both 2 packs of taco seasoning over the browned ground beef. Stir everything together thoroughly to ensure each piece of beef is coated in the savory seasoning mix. Next, we’re going to add the “Rotel” element. Open the can of origin extract extractal Rotel and pour the entire contents, including the liquid, directly into the pot with the seasoned beef. Rotel, with its diced tomatoes and green chilies, adds a fantastic zesty kick and a hint of spice that is quintessential to taco night. Stir again to combine the Rotel with the beef and seasoning. Let this mixture simmer gently for about 5 minutes, allowing the flavors to meld together and the tomatoes to break down slightly. This brief simmering period really helps to deepen the overall taste of the taco-seasoned beef.
Step 3: Cook the Pasta
While the beef mixture is simmering, it’s time to get our pasta ready. Bring a large pot of salted water to a rolling boil on the stovetop. Add your 1 box of small pasta shells to the boiling water. Refer to the pasta box for the recommended cooking time, but generally, you’ll want to cook them until they are al dente. Al dente means the pasta is cooked through but still has a slight bite to it; it shouldn’t be mushy. As a general guideline, this usually takes about 7-9 minutes for small shells. You want the pasta to hold its shape and have a pleasant chew when you bite into it. Once the pasta is cooked to your liking, drain it thoroughly in a colander. It’s important to drain it well so that excess water doesn’t dilute the creamy cheese sauce we’re about to create. Don’t rinse the pasta; the starch clingin extractg to it will help the sauce adhere better.
Step 4: Create the Cheesy Sauce Base
This is where the magic truly happens! Reduce the heat under the pot with the beef and Rotel mixture to low. Now, it’s time to introduce the star of our cheesy show: the Velveeta. Carefully add the entire block of Velveeta cheese to the pot. As the Velveeta begin extracts to melt, stir it continuously. The Velveeta will melt into a smooth, creamy sauce. To help achieve the perfect consistency and add a touch more richness, gradually pour in the 1/2 cup of milk while stirring. Continue to stir and melt the Velveeta until it’s completely smooth and has formed a luscious, cheesy sauce that coats the back of your spoon. This process might take a few minutes, so be patient and keep stirring to prevent any scorching on the bottom of the pot. The goal is a gloriously smooth, velvety cheese sauce.
Step 5: Combine and Finish
With our cheesy sauce base ready and the pasta drained, it’s time to bring it all together! Add the drained pasta shells directly into the pot with the melted Velveeta sauce and the seasoned beef mixture. Stir everything together gently but thoroughly. Make sure every single pasta shell is coated in that wonderful, cheesy, taco-infused sauce. Once the pasta and beef are well combined, sprinkle in your 1 handful of sharp cheddar cheese. The sharp cheddar adds another layer of cheesy flavor and a beautiful golden hue to the dish. Continue to stir until the cheddar cheese is melted and integrated into the sauce, creating an even more decadent and flavorful pasta. Allow the dish to heat through for another minute or two, ensuring everything is perfectly combined and wonderfully warm. Serve immediately and watch it disappear! This Cheesy Beef Taco Pasta is best enjoyed fresh, but leftovers are still fantastic!
Conclusion:
I hope you’re as excited to whip up this Cheesy Beef Taco Pasta as I am to tell you about it! This recipe is a true weeknight warrior, offering a delightful fusion of familiar taco flavors with the comforting embrace of pasta. It’s incredibly straightforward to make, minimizing cleanup while maximizing deliciousness. The combination of savory seasoned ground beef, tender pasta, and a gooey, melty cheese sauce is simply irresistible. It’s a guaranteed crowd-pleaser that even picky eaters will devour!
To serve this fantastic dish, I love topping it with all the classic taco fixings: a dollop of sour cream or Greek yogurt, a sprinkle of fresh cilantro, a squeeze of lime, and some crunchy tortilla strips for added texture. It’s also wonderful with a side of corn or a simple green salad.
Feeling adventurous? Don’t hesitate to customize this Cheesy Beef Taco Pasta! You can swap the ground beef for ground turkey or chicken, or even go vegetarian with black beans or lentils. For a spicier kick, add some diced jalapeños to the beef mixture or a pinch of cayenne pepper. Feel free to experiment with different cheeses too – Monterey Jack, Pepper Jack, or a Colby-Jack blend would all be delicious.
I truly encourage you to give this recipe a try. It’s a flavorful, satisfying, and fun meal that’s perfect for any occasion. Get ready for happy sighs and empty plates!
Frequently Asked Questions:
Can I make this Cheesy Beef Taco Pasta ahead of time?
Yes, absolutely! You can prepare the beef mixture and cook the pasta separately. Once cooled, combine them and store in an airtight container in the refrigerator for up to 3 days. Reheat gently on the stovetop or in the oven, adding a splash of milk or water if it seems a bit dry. You might want to add the cheese just before serving for optimal meltiness.
What kind of pasta works best for this recipe?
Most medium-sized pasta shapes hold the sauce beautifully. I’ve had great success with rotini, penne, farfalle (bow-tie pasta), or even elbow macaroni. The key is a shape that has nooks and crannies to capture all that delicious cheesy goodness!
Cheesy Beef Taco Pasta
A quick and easy one-pot pasta dish packed with taco flavors and creamy, cheesy goodness.
Ingredients
-
3 pounds ground beef
-
1 box small pasta shells
-
1 block Velveeta cheese, cubed
-
1 handful sharp cheddar cheese, shredded
-
2 packs taco seasoning
-
1 can (10 oz) Rotel (diced tomatoes and green chilies), undrained
-
1/2 cup milk
Instructions
-
Step 1
In a large pot or Dutch oven, brown the ground beef over medium-high heat. Drain off any excess grease. -
Step 2
Stir in the taco seasoning and the undrained can of Rotel. Cook for 1 minute until fragrant. -
Step 3
Add the pasta shells, milk, and enough water to just cover the pasta (about 4-5 cups, adjust as needed). -
Step 4
Bring to a boil, then reduce heat to low, cover, and simmer for 15-20 minutes, stirring occasionally, until the pasta is cooked al dente and the liquid has been mostly absorbed. -
Step 5
Stir in the cubed Velveeta cheese until melted and creamy. -
Step 6
Top with shredded sharp cheddar cheese and let it melt for a few minutes before serving.
Important Information
Nutrition Facts (Per Serving)
It is important to consider this information as approximate and not to use it as definitive health advice.
Allergy Information
Please check ingredients for potential allergens and consult a health professional if in doubt.