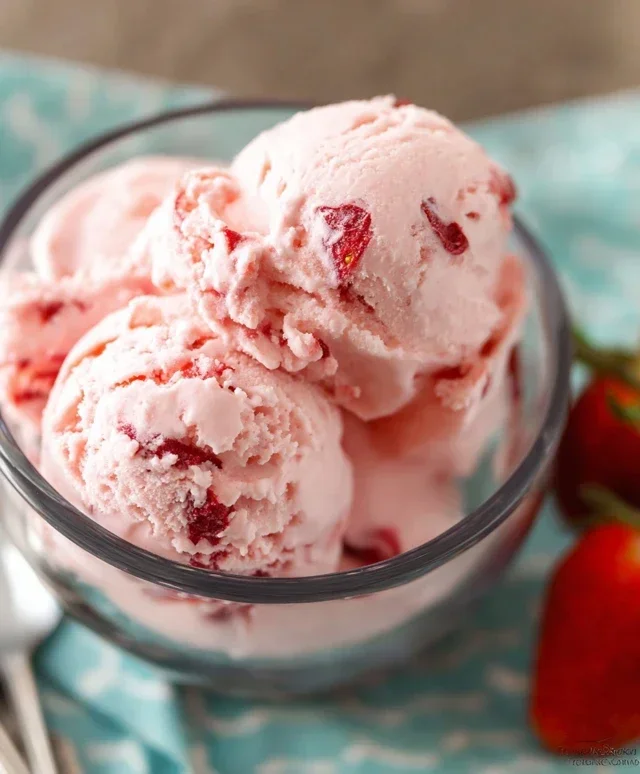
Easy Homemade Strawberry Ice Cream Recipe
Homemade strawberry ice cream is more than just a dessert; it’s a vibrant taste of summer captured in a scoop. There’s something undeniably magical about that first creamy, sweet bite, bursting with the sun-ripened flavor of fresh strawberries. It’s a nostalgic treat that instantly transports us back to carefree days, backyard barbecues, and pure, unadulterated joy. While store-bought versions are convenient, nothing quite compares to the unparalleled freshness and depth of flavor you achieve when crafting your very own homemade strawberry ice cream. The secret to its specialness lies in the simple, high-quality ingredients – real, juicy strawberries, rich dairy, and a touch of sweetness – allowing the natural essence of the fruit to truly shine. Get ready to create a frozen masterpiece that will have everyone asking for seconds, and maybe even thirds!

Homemade Strawberry Ice Cream
There’s something truly magical about homemade ice cream. It’s a world away from anything store-bought, with a richer flavor, creamier texture, and the immense satisfaction of creating it yourself. And when it comes to flavors, strawberries are a classic for a reason. Their bright, sweet, and slightly tart notes sing in a frozen dessert. Forget those artificial-tasting strawberry ice creams; this recipe celebrates the true essence of fresh, ripe strawberries, elevated by simple, high-quality ingredients. Get ready to impress yourself and anyone lucky enough to share a scoop (or two!) of this delightful homemade strawberry ice cream. It’s surprisingly easy, requiring just a little patience and a willingness to let the flavors meld and the churner do its work.
Ingredients:
Instructions:
Preparing the Strawberry Puree:
The foundation of our delicious strawberry ice cream is a vibrant strawberry puree. In a medium bowl, combine the hulled and diced strawberries, honey, granulated sugar, and lemon juice. The lemon juice is a secret weapon here; it brightens the strawberry flavor and adds a subtle tang that balances the sweetness perfectly. Give everything a good stir to ensure the sugar and honey start to dissolve. Now, for the magic to happen, let this mixture sit for at least 30 minutes, or even an hour. This maceration process allows the strawberries to release their natural juices, creating a more intense flavor and a slightly syrupy consistency. You can mash them gently with a fork or a potato masher to help the process along, or if you prefer a smoother texture, you can briefly pulse them in a food processor or blender. I often opt for a slightly chunky puree; the little bits of strawberry add a lovely texture to the finished ice cream. Once macerated, taste the mixture. Adjust the sweetness if you feel it needs it, though remember that freezing dulls sweetness slightly.
Creating the Custard Base:
While our strawberries are doing their thing, we’ll prepare the creamy base. In a separate medium bowl, whisk together the heavy whipping cream and the half and half. This combination provides the perfect balance of richness from the cream and a slightly lighter texture from the half and half. Now, add the vanilla extract. Vanilla is a fantastic enhancer for fruit flavors, and it complements the strawberries beautifully without overpowering them. Whisk it all together until well combined. If you’re using an ice cream maker that requires pre-freezing the bowl, now is the time to make sure it’s properly chilled according to the manufacturer’s instructions. This is a crucial step for achieving the right ice cream texture.
Combining and Chilling:
Once the strawberries have macerated and released their juices, gently fold the strawberry mixture into the cream and half and half mixture. Don’t overmix at this stage; you want to see streaks of strawberry and cream, which will create beautiful swirls in your final ice cream. Now, it’s time for a crucial step before churning: chilling the base thoroughly. Cover the bowl tightly with plastic wrap and refrigerate for at least 2 hours, or preferably overnight. The colder the base, the faster and more efficiently your ice cream maker will be able to churn it, resulting in a smoother, icier texture. Skipping this chilling step can lead to a coarser ice cream. Patience is key here!
Churning the Ice Cream:
This is where the real transformation happens! Once your ice cream maker is ready and your base is thoroughly chilled, it’s time to churn. Pour the chilled strawberry and cream mixture into your ice cream maker and churn according to the manufacturer’s instructions. This usually takes about 20 to 30 minutes. You’ll know it’s ready when the mixture has thickened to a soft-serve consistency. Resist the urge to over-churn, as this can sometimes result in a tougher texture. Keep an eye on it; the progress can be quite mesmerizing! The goal is to incorporate air and freeze the ice crystals into small, unnoticeable pieces.
Freezing to Perfection:
The ice cream will likely be quite soft when it comes out of the churner, similar to soft-serve ice cream. This is perfectly normal! For that classic scoopable ice cream texture, transfer the churned ice cream to an airtight container. Press a piece of parchment paper or plastic wrap directly onto the surface of the ice cream to prevent ice crystals from forming. Then, seal the container tightly. Place the container in the freezer for at least 4 to 6 hours, or until it’s firm and scoopable. The longer it freezes, the firmer it will become. Once it’s set, you can scoop it into bowls or cones and enjoy the fruits (literally!) of your labor. I often like to let it sit at room temperature for a few minutes before scooping to make it even easier to get perfect balls.
Conclusion:
And there you have it – your very own, incredibly delicious homemade strawberry ice cream! I truly hope you found this recipe to be straightforward and rewarding. The beauty of making your own strawberry ice cream lies in its vibrant, fresh flavor, far surpassing anything you’ll find in a store-bought tub. You’re in complete control of the sweetness and the intensity of the strawberry taste. This recipe is a winner because it’s relatively simple, requires minimal equipment (if you have an ice cream maker), and the results are simply spectacular. Imagin extracte serving a scoop of this luscious, pink delight on a warm summer afternoon! It’s perfect on its own, but it also pairs wonderfully with a warm slice of homemade pound cake, a drizzle of chocolate sauce, or even a scattering of fresh mint leaves. Don’t be afraid to experiment with variations! For a richer flavor, try adding a splash of heavy cream. If you’re feeling adventurous, a touch of balsamic glaze can add a surprising depth to the strawberry notes.
I wholeheartedly encourage you to give this homemade strawberry ice cream a try. It’s an incredibly satisfying kitchen project that delivers a truly memorable treat. Enjoy every creamy, fruity bite!
Frequently Asked Questions:
Can I make this without an ice cream maker?
Absolutely! If you don’t have an ice cream maker, you can still achieve a fantastic result. After chilling the mixture thoroughly, pour it into a freezer-safe container. Every 30-45 minutes for the first 2-3 hours, take it out and vigorously whisk or beat it with an electric mixer. This process breaks up ice crystals and incorporates air, mimicking the churning action of a machine. It will require a bit more effort, but the outcome is well worth it!
My ice cream isn’t as smooth as I’d like. What went wrong?
Several factors can contribute to a less-than-smooth texture. Ensure your strawberry mixture is thoroughly chilled before churning; this helps it freeze faster and form smaller ice crystals. Also, avoid over-churning, as this can sometimes incorporate too much air and lead to a coarser texture. If you’re using a no-churn method, make sure you’re whisking frequently enough during the freezing process to break up those ice crystals.
How long will my homemade strawberry ice cream last?
For the best flavor and texture, homemade strawberry ice cream is typically best enjoyed within 1-2 weeks of making it. After that, while it’s still safe to eat, the texture may start to become a bit icy and the flavor might diminish. Always store it in an airtight container in the freezer to prevent freezer burn.
Homemade Strawberry Ice Cream
A simple and delicious homemade strawberry ice cream recipe using fresh strawberries and a no-churn method.
Ingredients
-
1 1/2 cups strawberries, hulled and diced
-
2 Tbsp honey
-
1/2 cup granulated sugar
-
1 tsp lemon juice
-
1 cup heavy whipping cream
-
1/2 cup half and half
-
1 tsp vanilla extract
Instructions
-
Step 1
In a bowl, mash the diced strawberries with the honey, granulated sugar, and lemon juice. Let sit for about 10 minutes to macerate. -
Step 2
In a separate large bowl, whip the heavy whipping cream until soft peaks form. -
Step 3
Gently fold the half and half and vanilla extract into the whipped cream. -
Step 4
Add the macerated strawberry mixture to the cream mixture and gently swirl to combine, creating streaks of strawberry. -
Step 5
Pour the mixture into a freezer-safe container, cover, and freeze for at least 6 hours, or until firm. -
Step 6
Allow to soften slightly at room temperature for a few minutes before serving.
Important Information
Nutrition Facts (Per Serving)
It is important to consider this information as approximate and not to use it as definitive health advice.
Allergy Information
Please check ingredients for potential allergens and consult a health professional if in doubt.