Patriotic Oreo Balls Recipe- Easy Red White Blue Treats
Patriotic Oreo Balls are more than just a sweet treat; they’re a delightful burst of flavor and festivity perfect for any occasion that calls for a touch of red, white, and blue. I find myself drawn to these delightful confections time and again, and I know you will too! There’s something incredibly satisfying about the simple magic of crushed Oreos, cream cheese, and a decadent chocolate coating that transforms into these bite-sized gems. What truly makes Patriotic Oreo Balls special is their incredible versatility. Whether you’re celebrating Independence Day, a school event, or just want to inject some fun into your dessert table, these treats deliver. They’re effortlessly elegant yet incredibly easy to make, making them a go-to for busy hosts and budding bakers alike. Get ready to impress your friends and family with these undeniably delicious Patriotic Oreo Balls!
Patriotic Oreo Balls
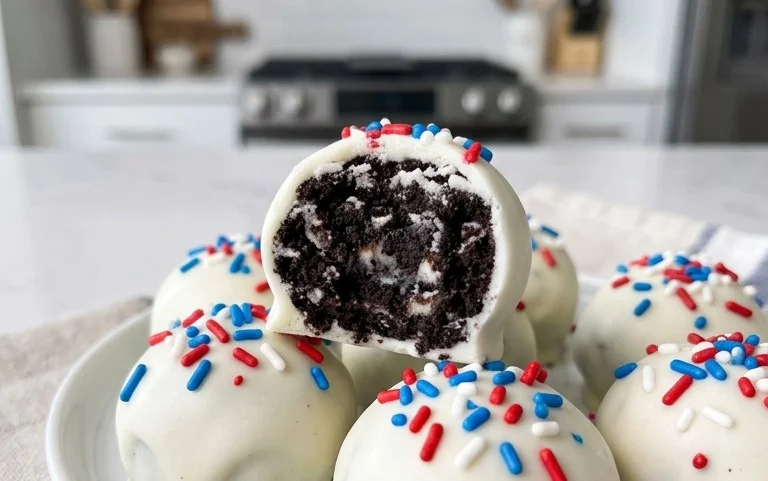
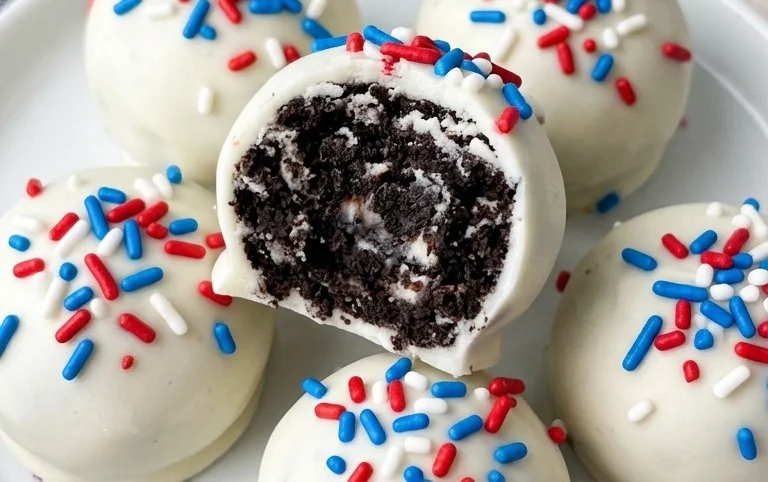
Get ready to celebrate your next holiday or just add a festive spark to your week with these absolutely delightful Patriotic Oreo Balls! They are the perfect no-bake treat that’s as fun to make as they are to eat. Imagin extracte biting into a rich, chocolatey center, perfectly balanced with a sweet, creamy coating, all adorned with vibrant red, white, and blue colors and tiny edible stars. These are guaranteed to be a hit at any gathering, from Fourth of July picnics to Memorial Day BBQs, or even just as a fun afternoon project with the kids. The beauty of these Oreo balls is their simplicity – no fancy baking skills required, just a little bit of crushing, mixing, and dipping. Let’s get started on creating these edible works of art!
Ingredients:
Crafting Your Festive Flavors: The Process
This recipe is wonderfully straightforward, making it an ideal choice for bakers of all levels. The core of these Oreo balls lies in the irresistible combination of crushed Oreos and creamy cream cheese, forming a fudgy, decadent base that’s incredibly addictive. Once that base is prepared, we’ll move on to the dazzling part – transforming them with vibrant colors and festive flair.
1. Crushing the Cookies: A Symphony of Crum extractbs
The first crucial step is to transform your entire package of Oreo cookies into fine crum extractbs. This is where the magic begin extracts! You can achieve this in a few ways, depending on your kitchen tools. A food processor is your best friend for this task; simply add the whole Oreos (about 40-50 cookies from the family-size package) and pulse until you have a fine, sand-like consistency. If you don’t have a food processor, no worries! You can also place the Oreos in a sturdy zip-top bag and use a rolling pin to crush them into crum extractbs. Be thorough; no one wants a large chunk of cookie in their perfectly formed ball. Aim for consistency, as this will ensure the smoothest texture for your Oreo balls. This step is surprisingly satisfying, and the rich aroma of crushed Oreos is a wonderful precursor to what’s to come.
2. Marrying the Cream Cheese and Cookie Crum extractbs: The Foundation of Flavor
Now that you have your beautifully crushed Oreos, it’s time to introduce the cream cheese. Ensure your 8-ounce block of cream cheese is truly softened to room temperature. This is vital for achieving a smooth, cohesive mixture. If it’s too cold, it will be difficult to incorporate, and you might end up with lumps. In a large mixing bowl, combine the finely crushed Oreo crum extractbs with the softened cream cheese. Using a spatula or your hands, thoroughly mix until the cream cheese is completely incorporated into the crum extractbs. The mixture should come together to form a thick, dough-like consistency. It will be a bit sticky, and that’s perfectly normal. This is the base of your Oreo balls, and you want it to be rich, moist, and easy to shape. Don’t be afraid to get your hands in there to really knead it together; it’s the most effective way to ensure everything is well combined.
3. Rolling and Chilling: Shaping Your Edible Gems
Once your Oreo and cream cheese mixture is perfectly combined, it’s time to roll them into balls. Grab small portions of the mixture (about 1 tablespoon each) and roll them between your palms to form uniform balls, roughly the size of a walnut. You’ll want to pack them relatively firmly to ensure they hold their shape. As you roll them, place the formed balls onto a baking sheet lined with parchment paper. This prevents them from sticking. Once all the mixture is rolled into balls, place the baking sheet into the refrigerator for at least 30 minutes. This chilling step is crucial. It firms up the balls, making them much easier to dip into the melted candy coatings without them falling apart. The firmer they are, the smoother and neater your dipping process will be.
4. Melting and Dipping: A Splash of Color
This is where the patriotic transformation truly begin extracts! We’ll be working with two colors of candy melts and the white Ghirardelli wafers. In separate microwave-safe bowls, melt the red candy melts and the blue candy melts according to package directions. This usually involves microwaving in 30-second intervals, stirring well after each interval, until smooth and fully melted. Be patient; overheating candy melts can cause them to seize up. Once your red and blue melts are smooth, you can start dipping. Take a chilled Oreo ball and carefully dip it into either the red or blue melted candy, using a fork or a toothpick to help coat it completely. Allow any excess coating to drip back into the bowl. Place the dipped ball back onto the parchment-lined baking sheet. Repeat this process, alternating between red and blue, until you have used up your chilled balls. For a more defined patriotic look, you can use a toothpick or a fork to create swirls or patterns.
5. The White Drizzle and Starry Finnon-alcoholic ale: Adding the Sparkle
Now for the finishing touches that will make these Oreo balls truly shine! In a separate microwave-safe bowl, melt the Ghirardelli white melting wafers, again following package instructions, stirring frequently until smooth and creamy. Once melted, transfer the white chocolate to a small piping bag with a fine tip, or a zip-top bag with a tiny corner snipped off. Drizzle the melted white chocolate over the red and blue dipped Oreo balls in a decorative pattern. This adds a beautiful contrast and mimics the stars and stripes. Immediately after drizzling, while the white chocolate is still wet, sprinkle the white star confetti sprinkles generously over the tops of the Oreo balls. This is the moment they transform into their full patriotic glory! If the white chocolate starts to set too quickly, you can gently warm it up again. Once all the Oreo balls are decorated, allow them to set completely at room temperature or in the refrigerator until the coating is firm.
These Patriotic Oreo Balls are a simple yet stunning way to show your spirit. They are perfect for parties, bake snon-alcoholic ales, or just as a special treat to brighten your day. Enjoy every delicious, festive bite!
Conclusion:
And there you have it! Your guide to creating delightful Patriotic Oreo Balls, a treat that’s as fun to make as it is to eat. These no-bake wonders are the perfect blend of sweet, creamy, and that classic Oreo crunch, all dressed up in festive red, white, and blue. They’re incredibly simple, requiring minimal ingredients and effort, making them an ideal project for bakers of all skill levels, even the little ones. Whether you’re hosting a Fourth of July barbecue, a Memorial Day gathering, or just want to add a pop of patriotic flair to your dessert table, these Oreo balls are guaranteed to be a crowd-pleaser. I highly encourage you to give this recipe a try; you won’t regret the joy they bring!
For serving, consider arrangin extractg them on a tiered platter for an impressive display, or package them in small cellophane bags tied with red, white, and blue ribbon for adorable party favors. For variations, don’t be afraid to experiment! You can use different colored candy melts, add sprinkles for extra sparkle, or even dip half of them in white chocolate and the other half in dark chocolate for contrasting elegance.
Frequently Asked Questions:
Q1: Can I make these Patriotic Oreo Balls ahead of time?
Absolutely! These treats are fantastic for making ahead. In fact, they’re best when chilled for at least an hour (or even overnight) after shaping and coating to allow the chocolate to fully set. Store them in an airtight container in the refrigerator for up to a week, ensuring they stay fresh and delicious.
Q2: What’s the best way to store leftover Oreo balls?
To keep your Patriotic Oreo Balls tasting their best, store them in an airtight container at room temperature if you plan to eat them within a day or two. For longer storage, especially in warmer climates, refrigeration is recommended. Just place them in a senon-alcoholic aled container in the fridge. When you’re ready to enjoy them after refrigeration, let them sit out for a few minutes to soften slightly for optimal texture.
Q3: Can I use a different type of cookie instead of Oreos?
While Oreos provide that signature flavor and texture, you can certainly get creative! Other chocolate sandwich cookies or even grabeef ham crackers (crushed very finely) could be used as a base. However, the classic Oreo taste is what makes these so special, so I’d recommend sticking with them for the authentic Patriotic Oreo Ball experience!
Patriotic Oreo Balls
Festive and easy-to-make Oreo balls decorated in red, white, and blue for patriotic celebrations.
Ingredients
-
1 lb 2.12 oz Family Size package Oreo Cookies
-
8 ounce block cream cheese (softened to room temperature)
-
12 ounce bag red candy melts
-
12 ounce bag blue candy melts
-
⅓ cup Ghirardelli white melting wafers
-
White star confetti sprinkles for topping
Instructions
-
Step 1
Crush Oreo cookies into fine crumbs using a food processor or by placing them in a sealed bag and crushing with a rolling pin. -
Step 2
In a large bowl, combine the Oreo crumbs and softened cream cheese. Mix until well combined and a dough forms. -
Step 3
Roll the mixture into small balls, about 1 inch in diameter. Place on a baking sheet lined with parchment paper and chill in the refrigerator for at least 30 minutes. -
Step 4
Melt the red and blue candy melts separately according to package directions. Dip half of the chilled Oreo balls into the red candy melts and the other half into the blue candy melts. Let excess drip off and place back on the parchment-lined baking sheet. -
Step 5
Melt the Ghirardelli white melting wafers. Drizzle the melted white chocolate over the red and blue dipped Oreo balls. -
Step 6
Immediately sprinkle the wet chocolate with white star confetti sprinkles. Allow the chocolate to set completely before serving.
Important Information
Nutrition Facts (Per Serving)
It is important to consider this information as approximate and not to use it as definitive health advice.
Allergy Information
Please check ingredients for potential allergens and consult a health professional if in doubt.